Visual E2E Testing Setup and Quickstart
The Screener visual testing solution is going to be discontinued on May 31st, 2024. You can migrate to the new Sauce Labs Visual Testing solution by following the integration steps.
If you have any questions, please reach out to your Customer Success Manager or Sauce Labs Support.
Screener Docs are Now Sauce Docs
As part of our effort to bring you a unified documentation site, we've migrated all Visual Docs from Screener.io to Sauce Docs.
Sauce Labs Visual E2E Testing is an automated testing method that integrates with your Selenium WebDriver tests and code, enabling you to combine functional and visual regression UI testing across different browsers and resolutions in the same run. You can use any programming language that Selenium WebDriver supports without having to install additional libraries or SDKs.
What You'll Need
- A Sauce Labs self-serve or enterprise account with access to Visual Testing. To request access, contact your CSM or Sauce Labs Support. Visual Testing is not available for free-trial accounts.
- Your Sauce Labs Username and Access Key.
- Your Visual Testing Screener API Key.
- A GitHub account.
- Have Node.js installed.
Integration with Existing WebDriver Tests
Follow the steps below to add Visual E2E Testing functionality to your WebDriver tests.
New to WebDriver? See Quickstart with Sample WebDriver Tests.
Link Your Sauce Labs Account
From your terminal or IDE, navigate to your WebDriver test location, then set your Sauce Labs username, Sauce Labs access key, and Visual Testing Screener API key as environment variables. This way, you won't have to enter them with each command and your credentials are protected from exposure in your tests.
- Mac/Linux
- Windows Powershell
export SAUCE_USERNAME="Replace with your Sauce Labs username"
export SAUCE_ACCESS_KEY="Replace with your Sauce Labs access key"
export SCREENER_API_KEY="Replace with your Screener API key"
$Env:SAUCE_USERNAME = "Replace with your Sauce Labs username"
$Env:SAUCE_ACCESS_KEY = "Replace with your Sauce Labs access key"
$Env:SCREENER_API_KEY = "Replace with your Screener API key"
Add Sauce Labs Test Code
Sauce Capabilities
In your WebDriver test configuration section, add the sauce:options capability with your Sauce Labs credentials (as environment variables) nested underneath. Here's what you'd write in JavaScript, for example:
'sauce:options': {
  username: process.env.SAUCE_USERNAME,
  accessKey: process.env.SAUCE_ACCESS_KEY,
},
See Selenium on Sauce Labs for examples in Java, Python, Ruby, and C#.
Sauce Visual E2E Capabilities
- In your WebDriver capabilities, add the
sauce:visualcapability containing your desired project name and viewport size.
- JS/WebdriverIO
- Java
- Python
- Ruby
- C#
var capabilities = {
  ...
   'sauce:visual': {
     apiKey: process.env.SCREENER_API_KEY,
     projectName: 'my-project',
     viewportSize: '1280x1024'
   }
 }
DesiredCapabilities capabilities = new DesiredCapabilities();
MutableCapabilities sauceVisual = new MutableCapabilities();
sauceVisual.setCapability("apiKey", System.getenv("SCREENER_API_KEY"));
sauceVisual.setCapability("projectName", "my-project");
sauceVisual.setCapability("viewportSize", "1280x1024");
capabilities.setCapability("sauce:visual", sauceVisual);
capabilities = {
  ...
  'sauce:visual': {
    'apiKey': os.environ.get('SCREENER_API_KEY'),
    'projectName': 'my-project',
    'viewportSize': '1280x1024'
  }
}
capabilities = {
  ...
  "sauce:visual" => {
    apiKey: ENV["SCREENER_API_KEY"],
    projectName: 'my-project',
    viewportSize: '1280x1024'
  }
}
Dictionary sauceVisual = new Dictionary
{
    { "apiKey", Environment.GetEnvironmentVariable("SCREENER_API_KEY") },
    { "projectName", "my-project" },
    { "viewportSize", "1280x1024" }
};
browserOptions.AddAdditionalCapability("sauce:visual", sauceVisual, true);
- In your WebDriver capabilities, configure your test to connect to our remote hub,
https://hub.screener.io.
- JS/WebdriverIO
- Java
- Python
- Ruby
- C#
exports.config = {
hostname: 'hub.screener.io',
port: 443,
protocol: 'https',
path: '/wd/hub'
}
WebDriver driver = new RemoteWebDriver(
   new URL("https://hub.screener.io:443/wd/hub"),
capabilities);
host = "https://hub.screener.io:443/wd/hub"
self.driver = webdriver.Remote(host, capabilities)
Selenium::WebDriver.for(:remote, url: "https://hub.screener.io:443/wd/hub", desired_capabilities: caps)
driver = new RemoteWebDriver(new Uri("https://hub.screener.io:443/wd/hub"), capabilities);
Sauce Visual Commands
In your test script, add the below commands, in this order:
- Add the
@visual.initcommand to initialize your Visual test and add a name for it. - Add the
@visual.snapshotcommand in the places where you want to capture a visual snapshot.
- JS/WebdriverIO
- Java
- Python
- Ruby
- C#
it('should take snapshot', () => {
browser.url('https://screener.io')
browser.execute('/*@visual.init*/', 'My Visual Test')
browser.execute('/*@visual.snapshot*/', 'Home')
})
public void simpleTest() {
  WebDriver driver = this.getWebDriver();
  driver.get("https://screener.io");
  JavascriptExecutor js = (JavascriptExecutor) driver;
  js.executeScript("/*@visual.init*/", "My Visual Test");
  js.executeScript("/*@visual.snapshot*/", "Home");
}
def test_take_snapshot(self):
   self.driver.get('https://screener.io')
   self.driver.execute_script('/*@visual.init*/', 'My Visual Test')
   self.driver.execute_script('/*@visual.snapshot*/', 'Home')
it 'should take snapshot' do
  driver.navigate.to('https://screener.io')
  driver.execute_script('/*@visual.init*/', 'My Visual Test')
  driver.execute_script('/*@visual.snapshot*/', 'Home')
end
static void test() {
  driver.Navigate().GoToUrl("https://screener.io");
  IJavaScriptExecutor js = (IJavaScriptExecutor)driver;
  js.ExecuteScript("/*@visual.init*/", "My Visual Test");
  js.ExecuteScript("/*@visual.snapshot*/", "Home");
}
Run Test
From your terminal or IDE, run your test.
View Results
Go your Visual Testing Dashboard (Sauce Labs Visual Testing > Log in to Visual) to confirm that your test is running. It should take a few minutes to complete.
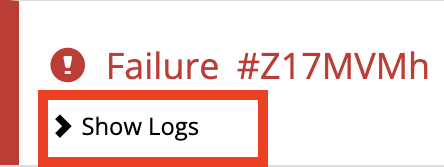
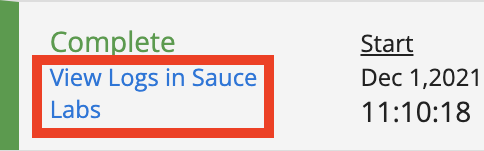
Click Show Logs > View Logs on Sauce Labs to see your test results on Sauce Labs.
Accept Baseline
This first test will be labeled as "failed" because there's no existing baseline to compare it against. To resolve this, you'll need to review and accept the new snapshots as your baseline. Go to the Quickstart > Accept Baseline to see an example of how to do this.
Apply UI Changes
- In your website development environment, apply a simple UI change, such as changing the font color or removing an image.
- From your IDE or terminal, run your test again.
- Go to your Visual Testing Dashboard, then click the changed state and review the change details.
Quickstart with Sample WebDriver Tests
Don't have WebDriver, but want to try? Follow the steps below to install our sample project and run your first WebDriver test with E2E Testing. In this example, you'll run a simple automated test on our demo website, Swag Labs.
- From your terminal, navigate to your machine's home directory, then clone the Visual E2E Quickstart repository:
git clone https://github.com/luishernandezv/visual-e2e
- Navigate to your project directory:
cd visual-e2e
- Install project dependencies:
npm install
Link Your Sauce Labs Account
Set your Sauce Labs username, Sauce Labs access key, and Visual Testing Screener API key as environment variables to avoid having to enter them with each command and to protect them from exposure in your tests.
- Mac/Linux
- Windows Powershell
export SAUCE_USERNAME="Replace with your Sauce Labs username"
export SAUCE_ACCESS_KEY="Replace with your Sauce Labs access key"
export SCREENER_API_KEY="Replace with your Screener API key"
$Env:SAUCE_USERNAME = "Replace with your Sauce Labs username"
$Env:SAUCE_ACCESS_KEY = "Replace with your Sauce Labs access key"
$Env:SCREENER_API_KEY = "Replace with your Screener API key"
Choose Sample Test
Choose which test in the project you'd like to run:
- simple-test.js (WebdriverIO only)
- simple-mocha-test.js (WebdriverIO with Mocha) (Mocha required)
- simple-mocha-test.js (WebdriverIO with Jest) (Jest required)
What's in the tests?
//Navigate to the test site
await browser.url('http://saucedemo.com')
- Adds your Sauce Labs credentials, test capabilities (e.g., project name), Visual E2E Testing commands.
- Launches the Sauce Labs demo website in a browser and logs in.
- Carries out a Visual E2E test session (i.e., taking UI snapshots).
- Ends session.
Run Test
In your terminal, execute the run command corresponding to the test framework you chose in the previous step.
- WebdriverIO
- WebdriverIO + Mocha
- WebdriverIO + Jest
npm run webdriverio
npm run test:mocha
npm run test:jest
View Results
Go your Visual Testing Dashboard (Sauce Labs > Visual Testing > Log in to Visual) to confirm that your test is running.
You'll see a new project under the name sauce-demos/swag-labs, plus a new branch called default.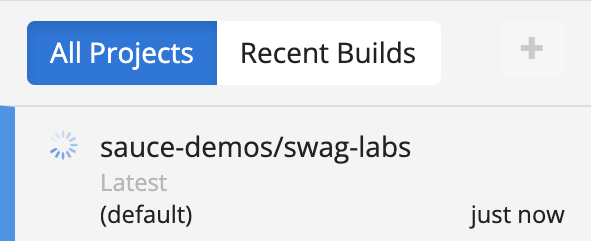
The test should take a few minutes to complete.
Accept Baseline
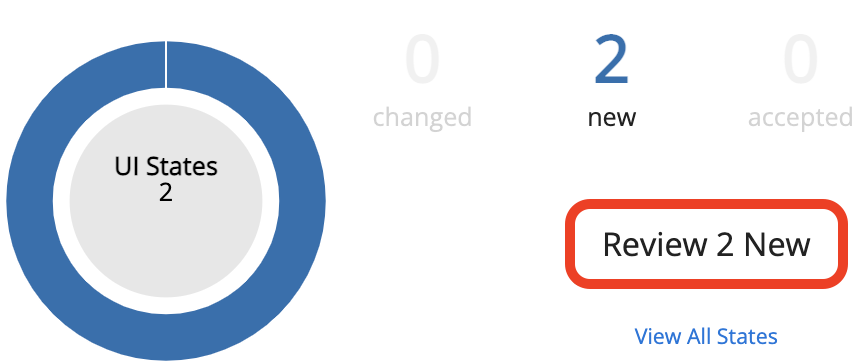
- This first test will be labeled as "failed" because there's no existing baseline to compare it against. To resolve this, review and accept the new snapshots as your baseline:
- From your Dashboard, click Review 2 New.
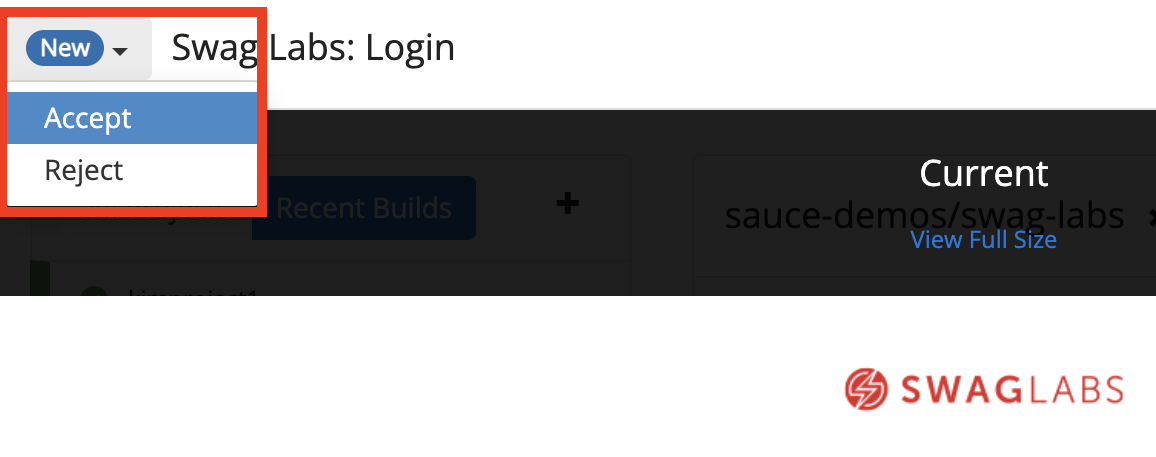
- Click on the first snapshot, Swag Labs: Login.
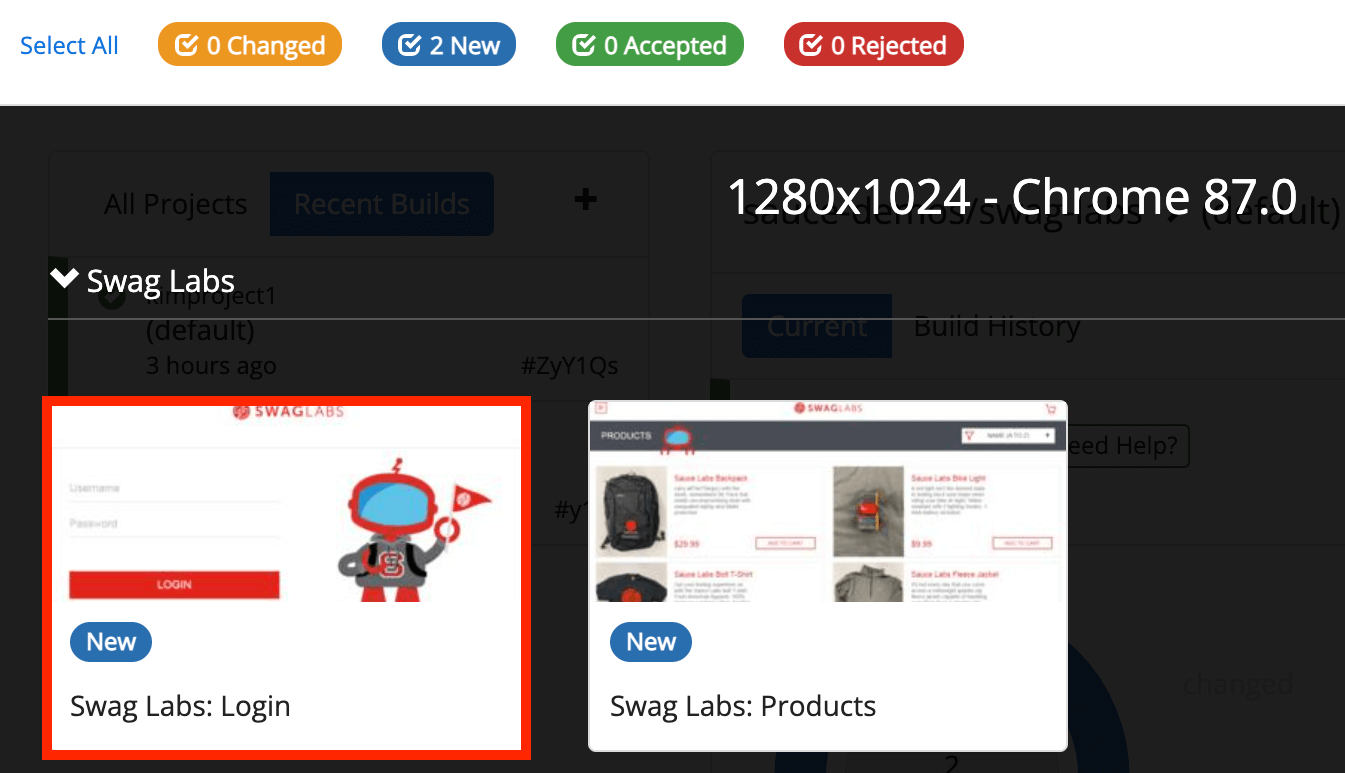
- Click New > Accept.
- Click on the second snapshot (Swag Labs: Products), then New > Accept.
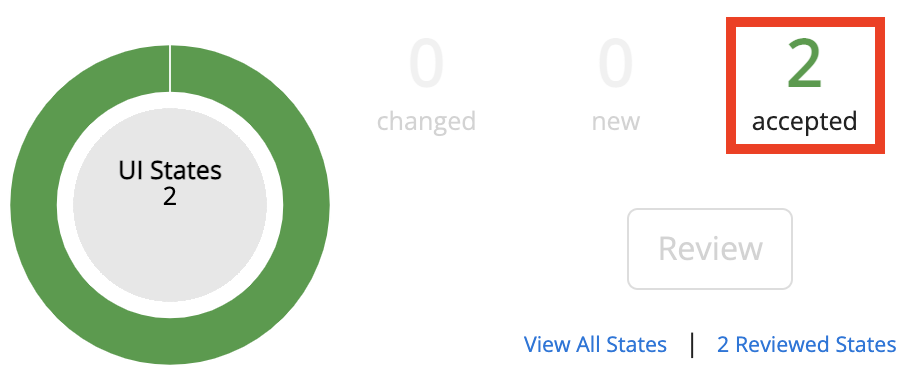
- Return to your Visual Testing Dashboard. The two states should now be labeled as Accepted.
Click Show Logs > View Logs on Sauce Labs to see your test results on Sauce Labs.
Apply UI Changes
- Next, we'll run a test containing a UI change to the Swag Labs website in which a button color changes from red to green. The change is pre-written into the test scripts and will activate once you execute the run command corresponding to the framework you used in the Run Test step:
- WebdriverIO
- WebdriverIO + Mocha
- WebdriverIO + Jest
npm run webdriverio-changes
npm run test:mocha-changes
npm run test:jest-changes
- On your Visual Testing Dashboard, you should see a new test running under the same project and branch. Because an element changed in one of your baseline snapshots, the test will be labeled as "failed". To resolve this, you'll need to review and accept them:
- Click Review 1 Changed.
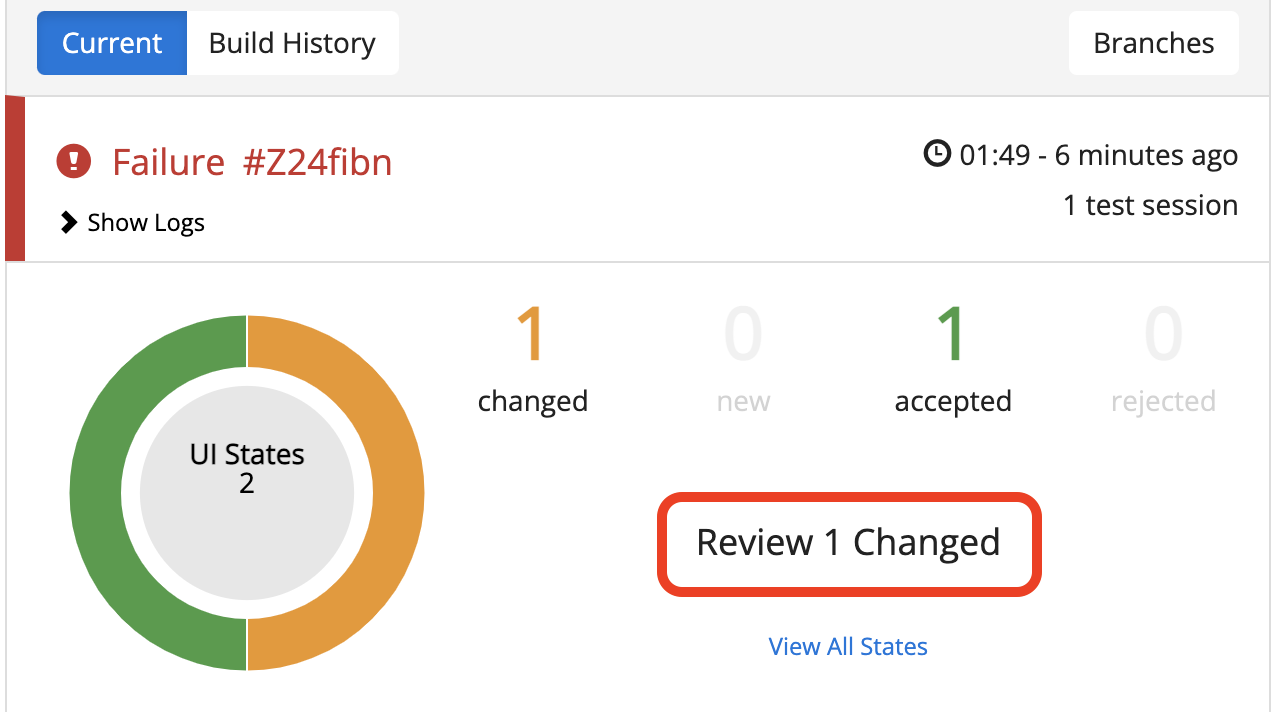
- You'll see that the login button color has changed from red to green. Click Changed > Accept.

- Click Review 1 Changed.
- Return to your Visual Testing Dashboard. The two states should now be labeled as Accepted. If you run this test again using the run commands under Apply UI Changes, the result will be labeled Success.
For each build, you should receive an email summary indicating the pass/fail status, delivered to the address associated with your Sauce Labs account.
Optional Next Steps
- Learn more about the Visual E2E Testing review workflow and commands.
- See full test script examples.
- Add more test configuration options.
- Set up continuous visual testing by integrating Visual E2E Testing into your CI.
- Confirm that your WebDriver test scripts use W3C WebDriver capabilities.
- Confirm that the browsers in your tests are supported by Sauce Labs.
- Try out these useful WebDriver settings in your tests:
- Timeouts: If you're using several visual assertions in your test, you may need to increase the
timeoutvalue in your configuration to help with test stability. A single assertion can take up to 45 seconds. If you have a WebdriverIO test with three snapshots (/*@visual.snapshot*/), for example, you'd need to set yourtimeoutvalue above 180000 milliseconds (3 mins) to prevent your test from failing. - Advanced Debugging: To enable more granular debugging details, add
extendedDebuggingto your test capabilities:
'sauce:options': {
  username: process.env.SAUCE_USERNAME,
  accessKey: process.env.SAUCE_ACCESS_KEY,
  extendedDebugging: true,
}, - Timeouts: If you're using several visual assertions in your test, you may need to increase the