Step Reference
Windows, Tabs, and Alerts
Launch a Website
This is usually the first step in a test case, but you can also add this step during the course of a test if you need to open a different website.
Go to...
Go toGo to pageGo to siteGo to web pageGo to website
Launch...
Launch website
Refresh...
Refresh website
Navigate...
NavigateNavigate pageNavigate siteNavigate toNavigate to pageNavigate to siteNavigate to websiteNavigate web pageNavigate website
Open...
Open pageOpen siteOpen web pageOpen website
Switch to Tab or Window
This command moves focus to another window or tab.
Switch to...
Switch to 2nd tabSwitch to 2nd windowSwitch to 3rd tabSwitch to 3rd windowSwitch to new tabSwitch to new windowSwitch to original tabSwitch to original windowSwitch to window with title [title1]
Switch to Alert, Confirm, or Prompt
An alert, confirm, or prompt window is different from a normal window, and the Switch to... window commands will not work.
When an alert window is encountered, a variable will be created win variables as
alert_message. This variable can then be used to verify specific messages, if needed.
Switch to alert...
Switch to alert and click on acceptSwitch to alert and click on cancelSwitch to alert and click on leaveSwitch to alert and click on okSwitch to alert and click on staySwitch to alert and save message as alert_set1 and click okSwitch to alert and enter "Please enter your name" and click on ok
Switch to confirm...
Switch to confirm and click on acceptSwitch to confirm and click on cancelSwitch to confirm and click on leaveSwitch to confirm and click on okSwitch to confirm and click on stay
Switch to prompt...
Switch to prompt and click on acceptSwitch to prompt and click on cancelSwitch to prompt and click on leaveSwitch to prompt and click on okSwitch to prompt and click on stay
Set Screen or Window Size
If a window is not displaying at the correct size, you can use the Set screen size commands at the beginning of the test case.
Set...
Set screen to hdSet screen to mobile phoneSet screen to tabletSet screen to tablet landscapeSet screen to 1080Set screen to 1080pSet screen to 720Set screen to 900Set screen to Full HDSet screen size - [width] * [height]Set window size - [width] * [height]
Example: Set screen size - 200 * 200
Click, Press, and Select
Click...
Click _css{"[selector]"}Click {xpath: "[address]"}Click on [exact attribute value]
Note: Attribute values are not case sensitive.Click on radio next to [text]Click on [text]Click on [text] after [text]Click on [text] before [text]Click on [text] for [text]
Note: This is useful when there are multiples of the same button, but there are unique identifiers for each.Click on [text] radioClick on [text] radio for [text]Click on _xy{x, y} of _css{some_html_node_id}
Note: The x, y coordinates are the location on the page of an HTML node.Click on _xy{x, y} of _xpath{“[//img]”}
Note: The x, y coordinates are the location on the page of an image, and the text is the image name.
Double Click...
Double Click on _xy{x, y} of [text]
Press...
Press _css{"[selector]"}Press {xpath: "[address]"}Press on radio next to [text]Press on [text] radioPress on [text] radio for [text]
Select...
Select _css{"[selector]"}Select [text]
Example:Select country
Note: In the example, "country" is the name of a dropdown.Select [text] from [text]
Example:Select united states from countrySelect {xpath: "[address]"}
Hover
In order to capture the full page screenshot of the application, AutonomIQ captures multiple screenshots of the page and stitches them together. During this process, the page gets scrolled up and down to capture screenshots of different sections of the page. This might cause certain types of modals/pop-ups that might be on the page to automatically close. Using Hover... will freeze the page and prevent popups from closing when scrolled.
Hover on...
Hover on _css{“[selector]”}Hover on _xy{x, y} of _xpath{//img[@id=”some_html_node_id”]}Hover on {xpath: “[address]”}Hover on [text]
Hover over...
Hover over _css{“[selector]”}Hover over {xpath: “[address]”}Hover over [text]
Enter, Type In, and Fill In
Enter...
Enter [textbox]
Example:Enter usernameEnter text in _css{“[selector]”}Enter text in {xpath: “[address]”}Enter text in [text]Enter [textbox] and save as xyz
Fill in...
Fill in [textbox]Fill in text in _css{“[selector]”}Fill in text in {xpath: “[address]”}Fill in text in [text]
Set text in...
Set text in _css{“[selector]”}Set text in {xpath: “[address]”}Set text in [text]
Type in...
Type in [textbox]Type in text in _css{“[selector]”}Type in text in {xpath: “[address]”}Type in text in [text]
Download file...
The Download file by clicking on “[download_label]” action will insert a Get Downloaded File button next to the respective test step. The file will download to the user's local machine.
The default timeout for a file download to start is five minutes, but it can be modified by using the --downloadTimeout [seconds] action.
Example
Download file by clicking on "text" --downloadTimeout 600
Once a download starts, the system will wait 30 minutes for it to complete.
You can also modify the download timeout on the Variables tab with the download_complete_timeout variable. (See Variables for more information.)
Example
Variable: download_complete_timeout
Value: [minutes]
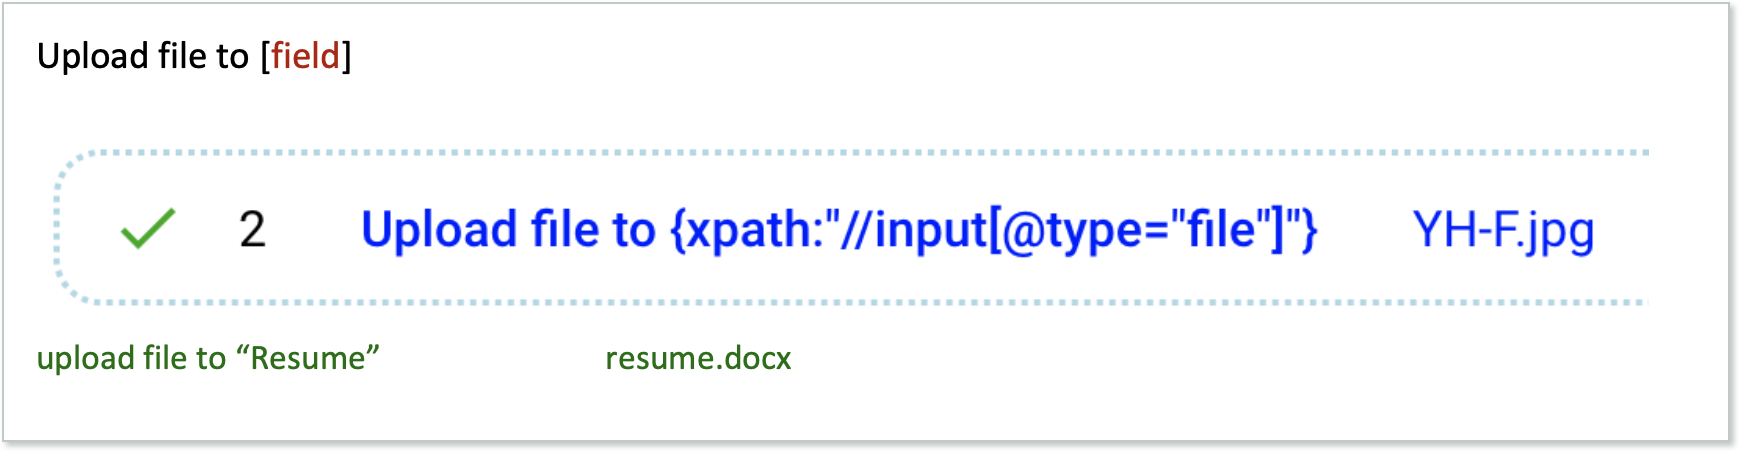
Upload file to...
The Upload file to... actions will upload a specified file to a specified location.
File download and upload are supported on the following browsers:
- Chrome (local and remote)
- Firefox (local and remote)
- Edge (remote) – Supported on the latest Chromium Edge browsers
Upload file to...
Upload file to _css{“[selector]”}Upload file to [text]Upload file to {xpath: “[address]”}
Assert and Verify
Using Assert will cause the test case to fail and stop at the failed step. Using Verify will cause the test step to fail, but the execution will continue to the next step.
Assert...
Assert [text] is visible on the pageAssert image of “text”, “text” is one the page
Verify...
Verify _css{“[selector]”} begins with [text]Verify _css{“[selector]”} begins with [text] or begins with [text]Verify _css{“[selector]”} begins with [text] or ends with [text]Verify _css{“[selector]”} contains [text]Verify _css{“[selector]”} contains [text] or begins with [text]Verify _css{“[selector]”} contains [text] or contains [text]Verify _css{“[selector]”} contains [text] or ends with [text]Verify _css{“[selector]”} ends with [text]Verify _css{“[selector]”} ends with [text] or ends with [text]Verify _css{“[selector]”} is _css{“[selector]”}Verify _css{“[selector]”} is disabledVerify _css{“[selector]”} is enabledVerify _css{“[selector]”} is not visibleVerify _css{“[selector]”} is visibleVerify [text] is on the page
Note: Can be used to wait until an element is loaded on the screen. Once it is loaded, the validation continues. If the element is not loaded within the timeout duration, the validation will fail and an error message will state that the element was not found. By default, the timeout is 8 seconds, but you can modify it:Verify [some text] is on the screen --timeout 30Verify {xpath: “[address]”} background-color is #ffffffVerify {xpath: “[address]”} begins with [text]
Example:Verify {xpath: "[//img[@class='gb_Wa']"} begins with [google]Verify {xpath: “[address]”} begins with [text] or begins with [text]Verify {xpath: “[address]”} begins with [text] or ends with [text]Verify {xpath: “[address]”} color is [#e01719]
Note: Any CSS attribute value can be validated using the xpath of the element (width, height, font-family, text-align, font-size, display, color, or background-color).
Example:Verify {xpath: "[//img[@class='gb_Wa']"} color is [#e01719]Verify {xpath: “[address]”} contains [text]Verify {xpath: “[address]”} contains [text] or begins with [text]Verify {xpath: “[address]”} contains [text] or contains [text]Verify {xpath: “[address]”} contains [text] or ends with [text]Verify {xpath: “[address]”} ends with [text]Verify {xpath: “[address]”} ends with [text] or ends with [text]Verify {xpath: “[address]”} font-size 26pxVerify {xpath: “[address]”} is {xpath: “[address]”}Verify {xpath: “[address]”} is disabledVerify {xpath: “[address]”} is enabledVerify {xpath: “[address]”} is not visibleVerify {xpath: “[address]”} is visibleVerify ${var_name} is on the screen
Note: Used to verify if a saved variable exists on the screen.Verify ${var_name} on the page
Note: Used to verify if a saved variable exists on the page.Verify alert is existsVerify new tab existsVerify new window exists
Note: Used to check if a new window appears.Verify pop up is exists
Note: Used to check if a new pop-up appears.Verify tab is exists
Note: Used to check if a new tab appears.Verify the current url is [url]
Note: Used to verify the URL of the current window when a user navigates to another URL or window.
Example:Verify the current URL is https://www.test.com/Verify url is [url]Verify variable ${var_name$} is [text]
Note: Verify if a saved variable matches with some text. Can also be used to verify the value saved for a variable.
Example:Verify variable $${variableName$} is "someText"Verify window is exists
Conditional Actions
Conditional actions are executed if certain conditions are true, and can be used instead of verify if additional actions are to be performed after the initial action.
if...
if {xpath: “[address]”} exists, click on [exact attribute value]if [condition], continueif current url is [url], enter [text]
Example:if current url is https://www.wikipedia.org/, click on English
Looping Actions
Blocks
Blocks can be used to loop through commands as many times as required.
Begin...
Begin block [block_name]
run...
run ${block_name$} for [number] timesrun ${block_name$} for [number] rowsrun ${block_name$} for all rowsrun ${block_name$} until [text] on the screen
Example
run ${block_name} for (number) times
begin block block_name
enter username
enter password
click on login
end block
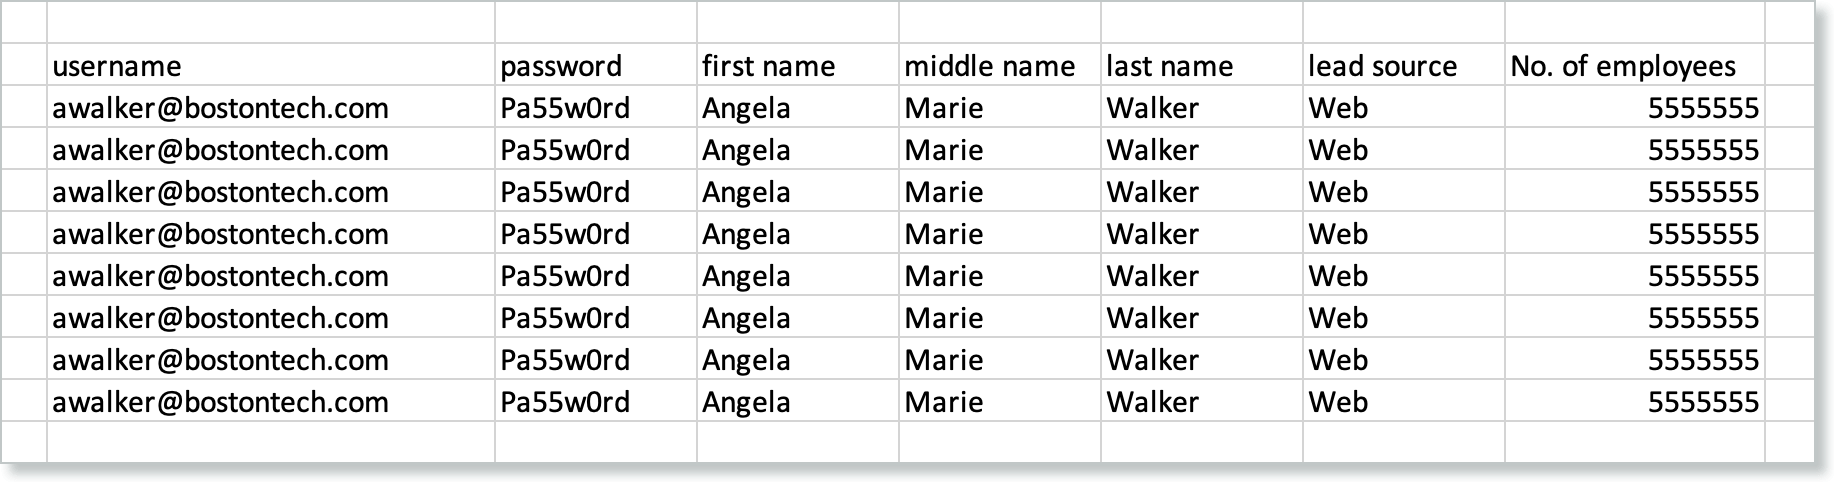
To run through multiple data sets for input in each loop, use separate data files with multiple data. After uploading the data file, link it to the relevant test case. In the following example, each row of data will correspond to an iteration of the loop.
Nested Blocks
Nested blocks are blocks within blocks. You can have a single or multiple levels of nesting blocks.
Example
Run ${block1} for all rows
Begin block block1
enter username
enter password
Run ${block2}

Begin block block2
enter username
enter password
end block

end block
Flows
Flows are similar to methods or functions, in which a user can create a block of code that can be reused across test cases. Flows can also be nested inside blocks.
Run ${flow_name$}...
Run ${flow_name$} for [number] timesRun ${flow_name$} for all rows
Decision-Making Actions
Decision-making actions can only be used with block and flow actions.
if...
An if action is used to decide whether a certain action or block of actions will be executed.
if...
if (condition), run ${block_name}
Example
if (condition), run ${block_name}
Begin block blockname
// Statements to execute if condition is true
End block
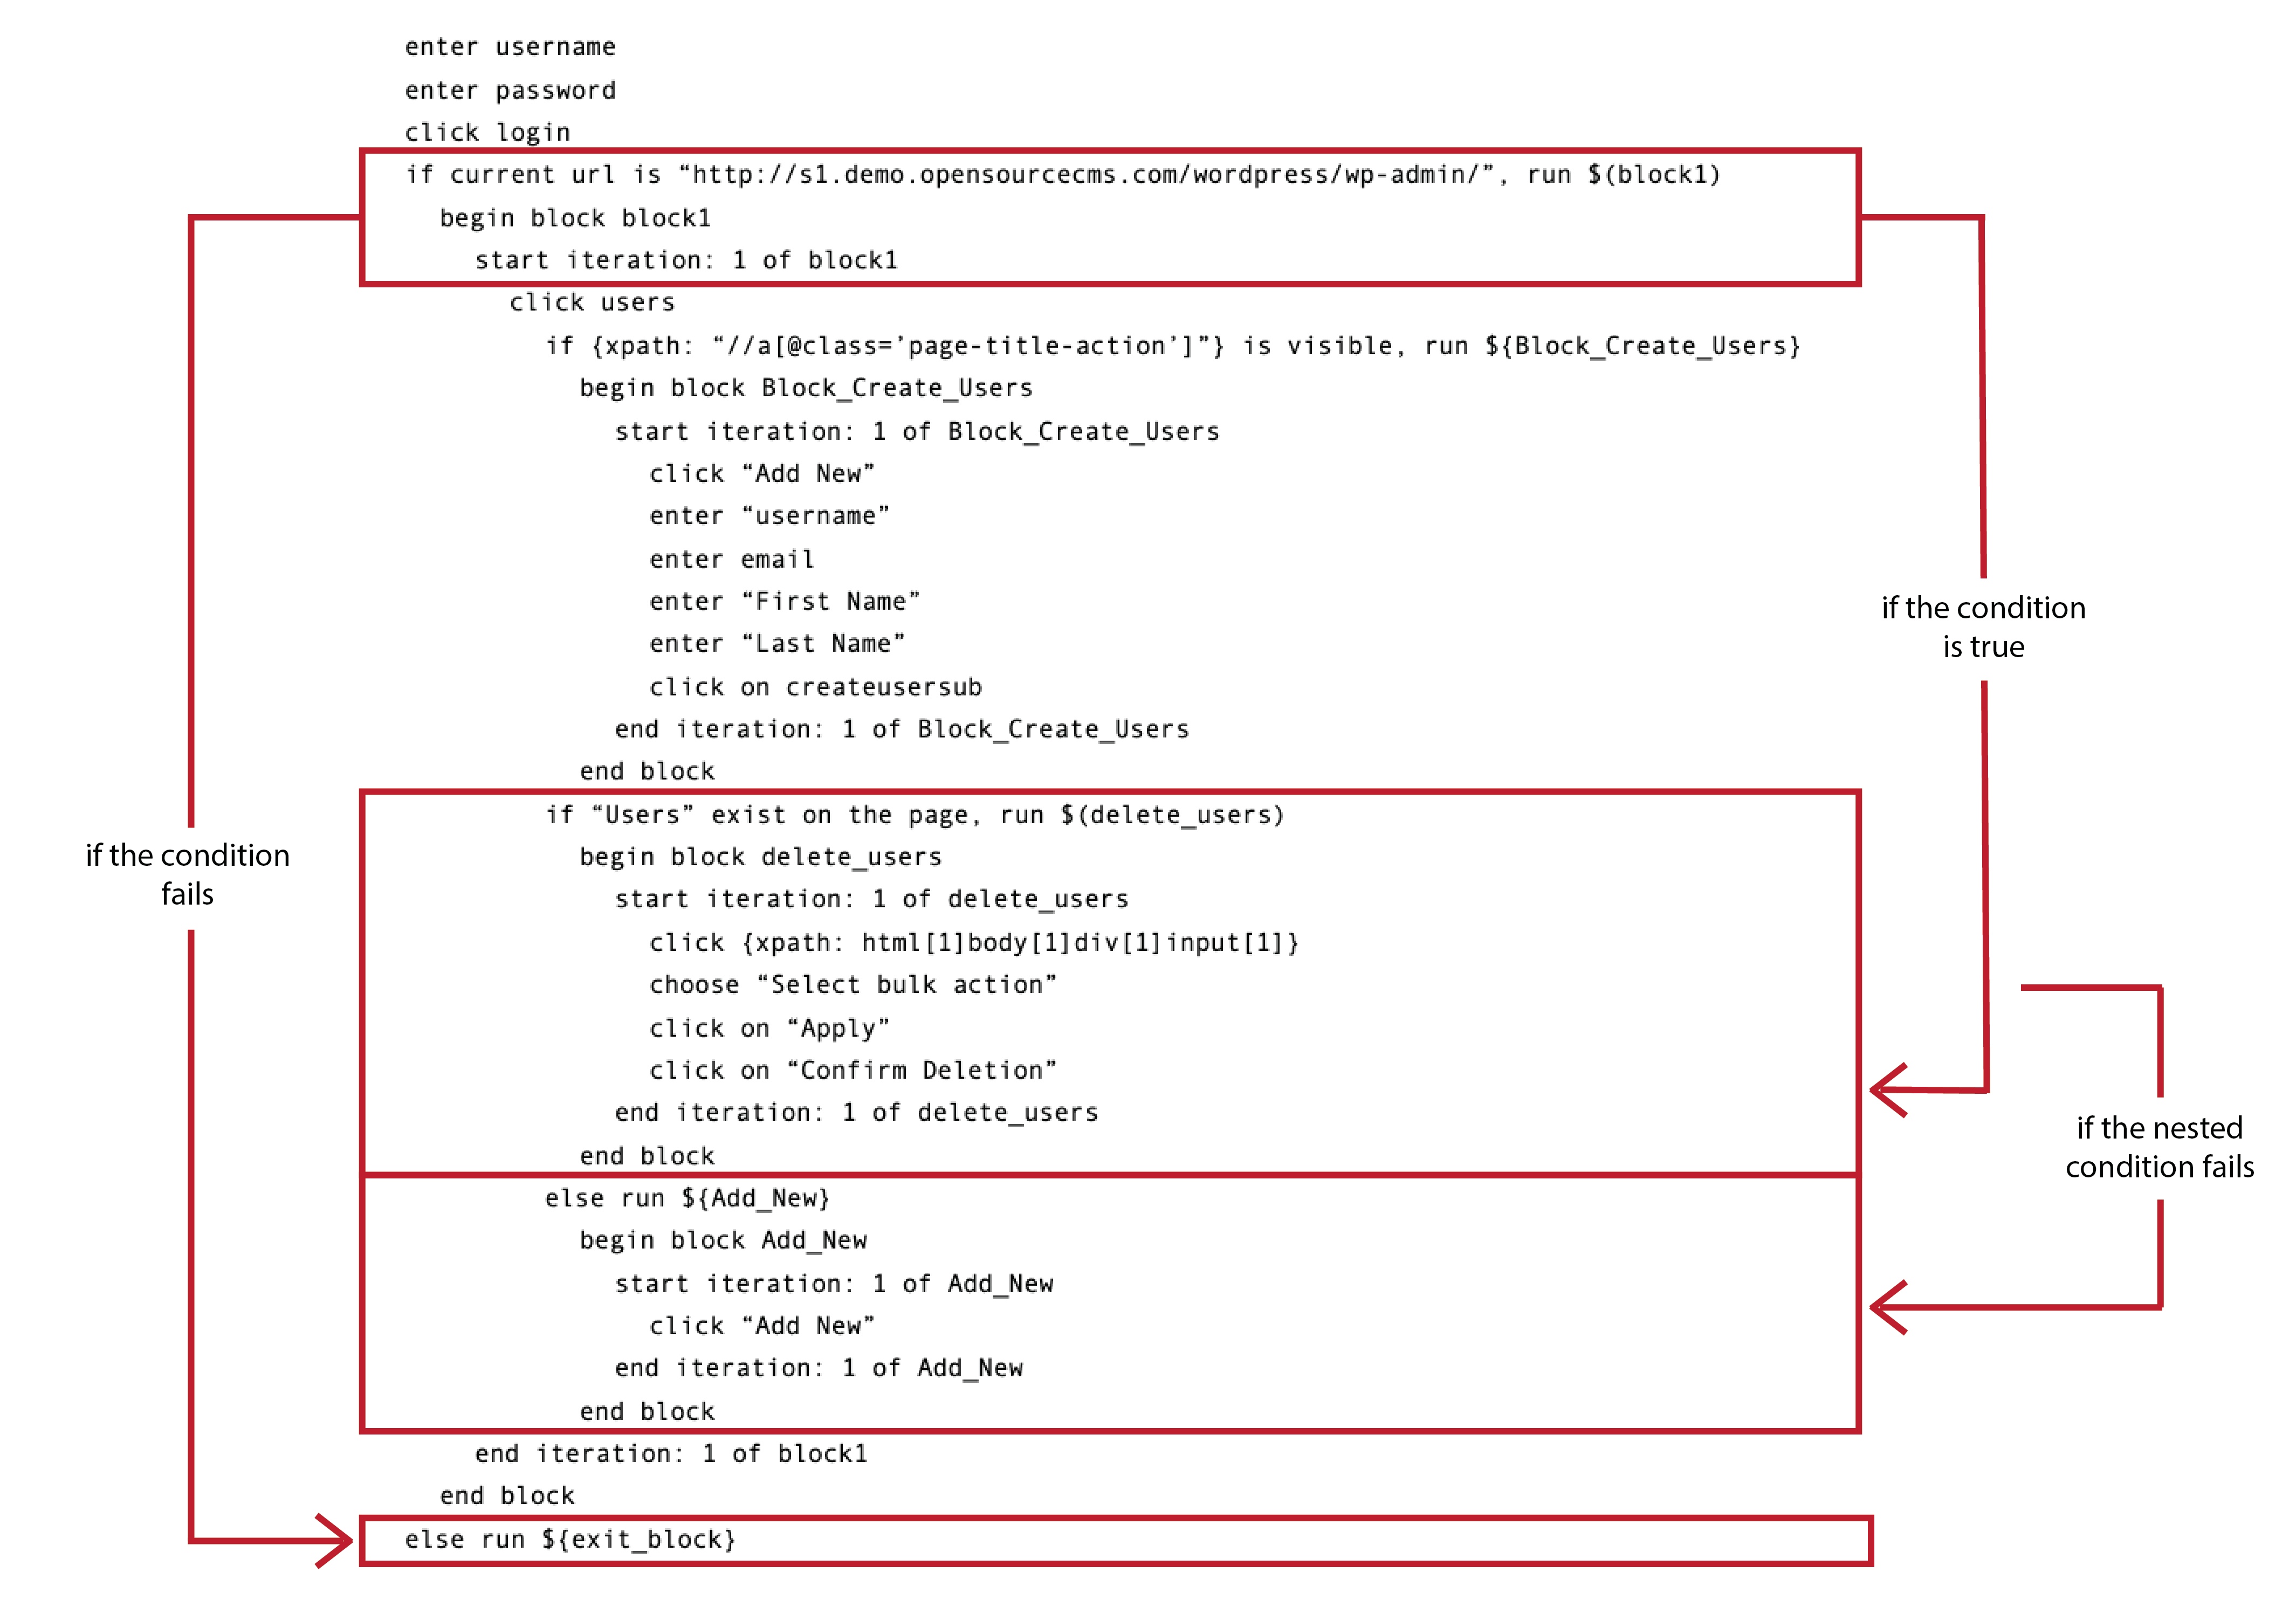
If the given xpath is visible, the user will be created.
if...else...
In an if...else... action, if a condition is true, a block of statements will be executed; if the condition is false, the else part will be executed.
Example
if {xpath: “//select[@id=’rolle’]”} exists, run ${subscribe}
else, run ${Help}
Begin block Help
click on “Help”
end block
In this example, the if condition is not satisfied so the else part is executed.
Nested if... Actions
if...else... actions can be nested inside other if or else actions.
else...if...
The else...if... (or elif) statement is useful when you need to check multiple conditions, or to avoid nesting if...else... blocks.
Syntax
if (condition1) run ${block1}
 //These statements would execute if the condition1 is true
elif(condition2) run ${block2}
//These statements would execute if the condition2 is true and condition1 is
False
End block
Else, run ${else_block}
 //These statements would execute if all the conditions return false
End block
End block
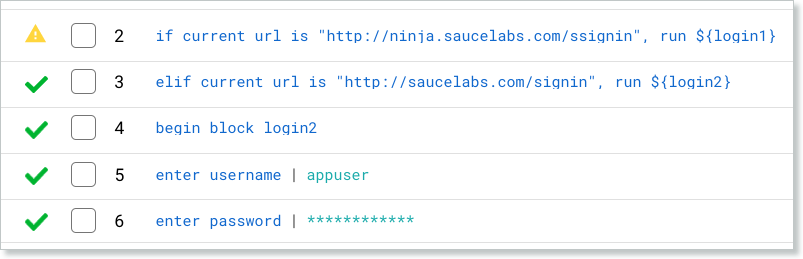
In this example, if the condition is not satisfied and block login1 is not executed, then the control moves to the elif action. Here the condition is satisfied and block login2 is executed.
Data-Driven Parsing
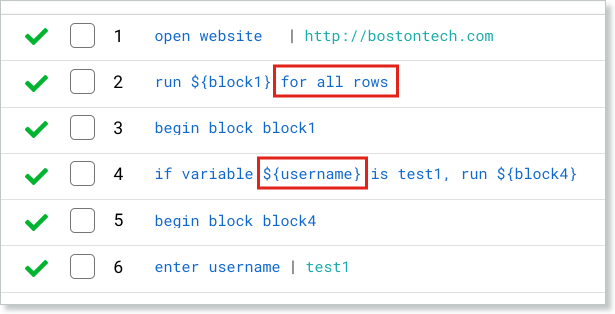
In this example, run${block1} for all rows will iterate through all rows in the data file. When the condition matches the current row, only that if block will be executed. Any subsequent elif/else actions won’t be executed, as well as any conditions that do not match.
if...continue...
In an if...continue... action, when the if condition is satisfied, the control jumps to the beginning of the loop for the next iteration.
Wait Actions
Wait...
Wait [number] secsWait for [number] secondsWait for [number] secsWait until _css{“[selector]”} is existsWait until _css{“[selector]”} is visibleWait until {xpath: “[address]”} is existsWait until {xpath: “[address]”} is visibleWait until [text] is existsWait until [text] is visible
Upload Actions
Files should be uploaded to the Artifacts section and attached to the test case.
Upload...
Upload file to _css{“[selector]”}Upload file to [text]Upload file to {xpath: “[address]”}
Date Support
Get today's date in a given format, provided on the Data tab.
{today, <format>}
- Enter Date +
{today, dd/mm/yy} - Enter Date +
{today, mm/dd/yy} - Enter Date +
{today, yy/mm/dd}
Relative Date support
Support is also provided for additions of days/months/years etc. This should be provided on the Data tab. For uploaded files this information can be found in the Test Data column.
Today's date:
{Today, MM/dd/yyyy}
Two days ago:
{Today - 2{dd}, MM/dd/yyyy}undefined>
Two days from now:
{Today + 2{dd}, MM/dd/yyyy}
One month ago:
{Today - 1{mm}, MM/dd/yyyy}
One month from now:
{Today + 1{mm}, MM/dd/yyyy}
One year ago:
{Today - 1{yy}, MM/dd/yyyy}
One year from now:
{Today + 1{yy}, MM/dd/yyyy}
Screenshot Actions
Take screenshotCapture screenshot
Table Instructions
The following action works for HTML tables with simple table-tr-td tags, not nested. It identifies the cell below the first column for which the value of the second column matches.
Action on "FirstColumnName" Where SecondColumnName [operator] SecondColumnValue
Click on...
Examples with different operators:
Click on "Move" Where Winning % is 55.71Click on "Black" Where Black Elo is not undefinedClick on "White" Where White Elo greater than 2700Click on "Move" Where Winning % lesser than 55Click on "White" Where White Elo begins with IClick on "Wins" Where Move starts with gClick on "Black" Where Date ends with ?Click on "White" Where Date contains 1994Click on "White" Where White Elo != undefinedClick on "Move" where Winning % > 55Click on "Move" Where Winning % < 55Click on "Move" Where Winning % <= 55Click on "Move" Where Wins >= 70060Click on "Move" Where Wins = 70060
Enter text...
In the following example, “Review” is the column name.
Enter text in "Review" Where Location is Austin
Click on radio...
In the following example, “No” is the column name.
Click on radio in "No" Where Location is Austin
Click on checkbox. . .
In the following example, “Choose” is the column name.
Click on checkbox in "Choose" Where Name is Anki
Dropdown Selection
In the following example, “Books” is the column name, and the value to choose is designated in test data.
Choose "Books" Where Name is SKM
In the following example, “The Shining” is the value in the dropdown. The column in which this comes up does not need to be specified.
Choose "The Shining" Where Name is Anki
Click/Enter Text Based on Row Number
Examples
Click on "Move" Where row is 3
Click on "Move" Where row is last
Get the Table Row Count
This will return the count of the number of rows in the table.
Example
Get table row count as variable_Name