Camera Image Injection
Real Devices Only
Camera Image Injection, also known as camera mocking, is a Sauce Labs Real Device Cloud (RDC) feature that simulates taking a picture through a mobile application. It allows you to test camera-based functionality by replacing the image normally captured by the device's camera with an image that you provide.
Camera Image Injection supports mobile applications that use the device camera to capture, process, or store images. For example, you can use Camera Image Injection to test workflows for scanning or depositing a check, scanning a QR code, capturing a profile photo, or taking an image to store or send through the application.
During a test, your application continues to access the device camera as it normally would. Instead of receiving an image captured by the physical device camera, the application receives the image you uploaded through Sauce Labs.
Make sure you have a debuggable AND not obfuscated version of your application uploaded to Mobile App Storage.
Prequisites
Before you use Camera Image Injection, make sure you have the following:
- A Sauce Labs account. You can Log in or sign up for a free trial.
- Your mobile application has been uploaded to Mobile App Storage.
- A debuggable and non-obfuscated version of the application.
- An image that meets the supported file format and size requirements.
Your application must be uploaded to Sauce Labs before testing because Camera Image Injection uses Sauce Labs storage to access your application information.
Supported Platforms and Specifications
Camera Image Injection is available on Sauce Labs Android and iOS real devices, including public and private real device clouds. It supports both front-facing and rear-facing system device cameras.
Uploaded images must be in JPG, JPEG, or PNG format and must not exceed 5 MB.
Supported and Unsupported Configurations
| Device or Framework | Supported | Not Supported |
|---|---|---|
| Device Type | ||
| Android real devices | ✓ | |
| iOS real devices | ✓ | |
| Android Emulators | ✕ | |
| iOS Simulators | ✕ | |
| App Type | ||
| Flutter(iOS/Android) | ✕ | |
| React Native(iOS/Android) | ✕ | |
| Cordova (iOS/Android) | ✕ | |
| Framework Type | ||
| Appium | ✓ | |
| Espresso (Android) | ✕ | |
| XCUITest (iOS) | ✕ |
- Mobile browsers and pre-installed system apps.
- Cross-platform development frameworks like Flutter, React Native, and Cordova (libraries and frameworks are not supported).
- Ephemeral apps (apps with temporary, disappearing messages and photos).
Android System Camera
For Android devices, there are multiple ways to capture an image, as described in the Android Camera API developer documentation. We support the following:
ACTION_IMAGE_CAPTUREIntent: opens the system camera and notifies the calling app gets when the image is taken.- camera2 API: everything is configured and handled from within the app.
- cameraX: leverages the capabilities of camera2, but uses a simpler, use case-based approach that is lifecycle-aware.
- Camera API (deprecated): partially supported. As with camera2, everything is handled in the app itself. QR Code readers often use
Camera#setPreviewCallback. We pass the injected image to this method, but the rest of this deprecated API is not supported. UI Elements will not likely display the injected image.
iOS System Camera
For iOS devices, the camera can be configured with different outputs. We support the following:
AVCapturePhotoOutput: for capturing still images. The results are received via theAVCapturePhotoCaptureDelegateand the methodcaptureOutput:didFinishProcessingPhoto:error:The other methods in this delegate are either deprecated or handle live photos, which we don't support.AVCaptureVideoDataOutput: for capturing video frames and processing them. The frames are received viaAVCaptureVideoDataOutputSampleBufferDelegateand the methodcaptureOutput:didOutputSampleBuffer:fromConnection:.AVCaptureMetadataOutput: for reading QR-Codes. The QR Codes are passed to the app viacaptureOutput:didOutputMetadataObjects:fromConnection:. We are detecting theAVMetadataMachineReadableCodeObjectand QR Codes are part of that.
Example Use Cases
Below are common use cases ideal for implementing Camera Image Injection in your tests.
-
Scanning a check for a mobile banking app deposit: Many mobile banking apps allow customers to deposit checks using their smartphone. The customer takes and uploads an image of their physical paper check, and the image is then submitted to the bank for processing.
-
Using a QR code to link to an embedded URL: QR codes are often used as a way to bridge print media to digital. Users take a photo with a QR code reader app, the app scans the code and directs them to an embedded URL. For use cases that involve scanning barcodes or QR codes, your own application in testing must do the actual image processing. Camera Image Injection passes your uploaded image directly to your app as if it came from the device camera; it does not do any processing.
-
Taking a selfie for a user profile photo: This could be taking a selfie or uploading a picture for apps that require a user profile photo. You can use Camera Image Injection to test image formats and sizes.
-
Taking an image to store or send via mobile app: Whether it’s a social media app or photo sharing, this use case can encompass many different scenarios. In its simplest form, it could be taking pictures from the front or back camera to send and/or archive within the app.
Live Testing
During a live test, Camera Image Injection allows you to replace the image captured by the device camera with an image that you upload through Sauce Labs. This lets you test camera-based functionality using a predefined image instead of physically taking a picture during the test.
Enable Image Injection
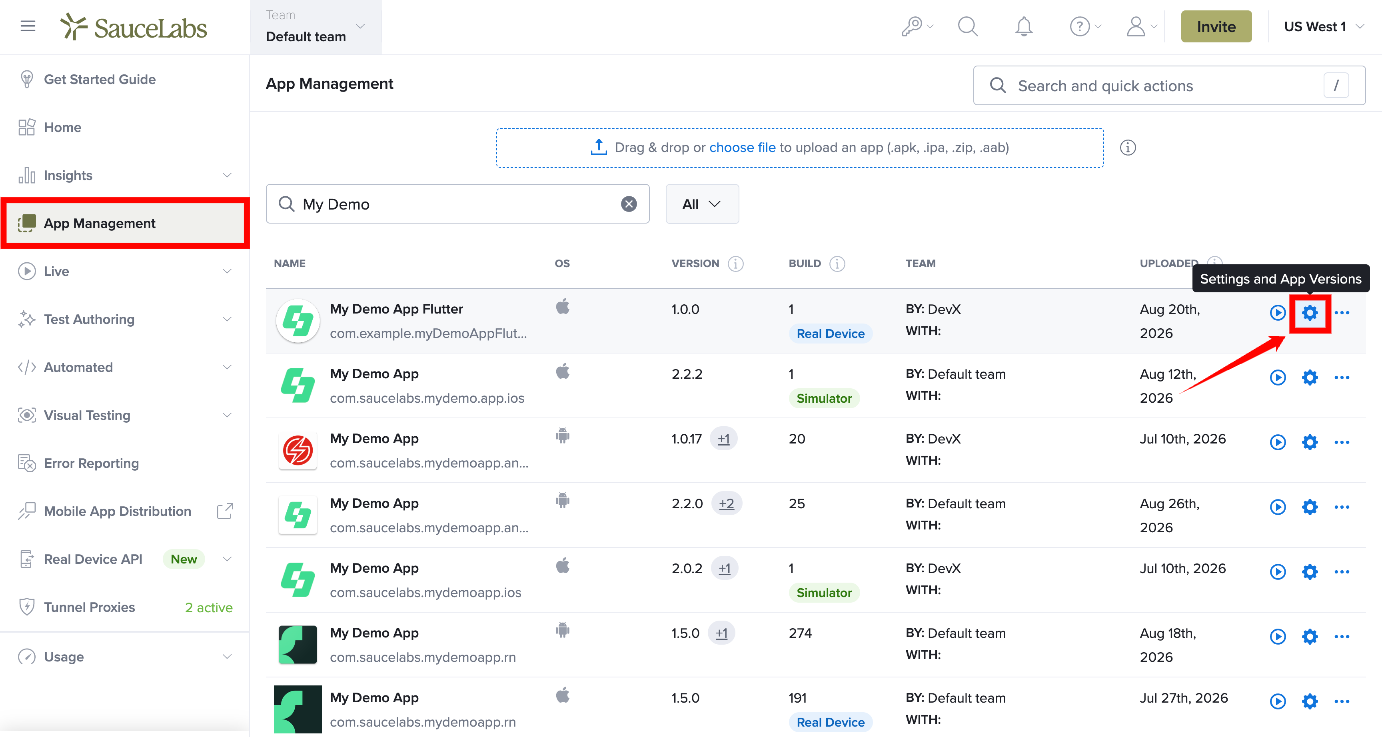
Step 1: In Sauce Labs, open App Management and locate the mobile app test you want to run. Hover over the test to display the available actions, and then select Settings.
Step 2: On the Settings page, locate the camera-related testing options. Make sure both Instrumentation and Image Injection are enabled. These settings are required before you can upload and use an image as camera input during the live test.
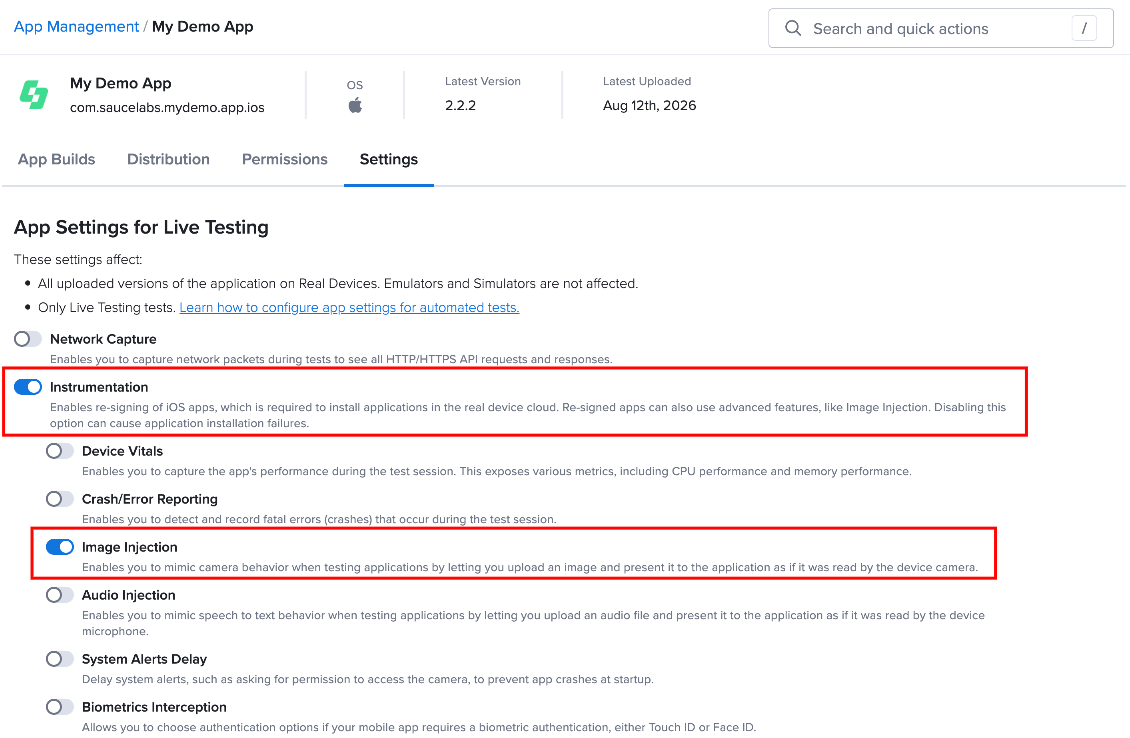
After enabling both options, return to the App Management page to continue starting your test.
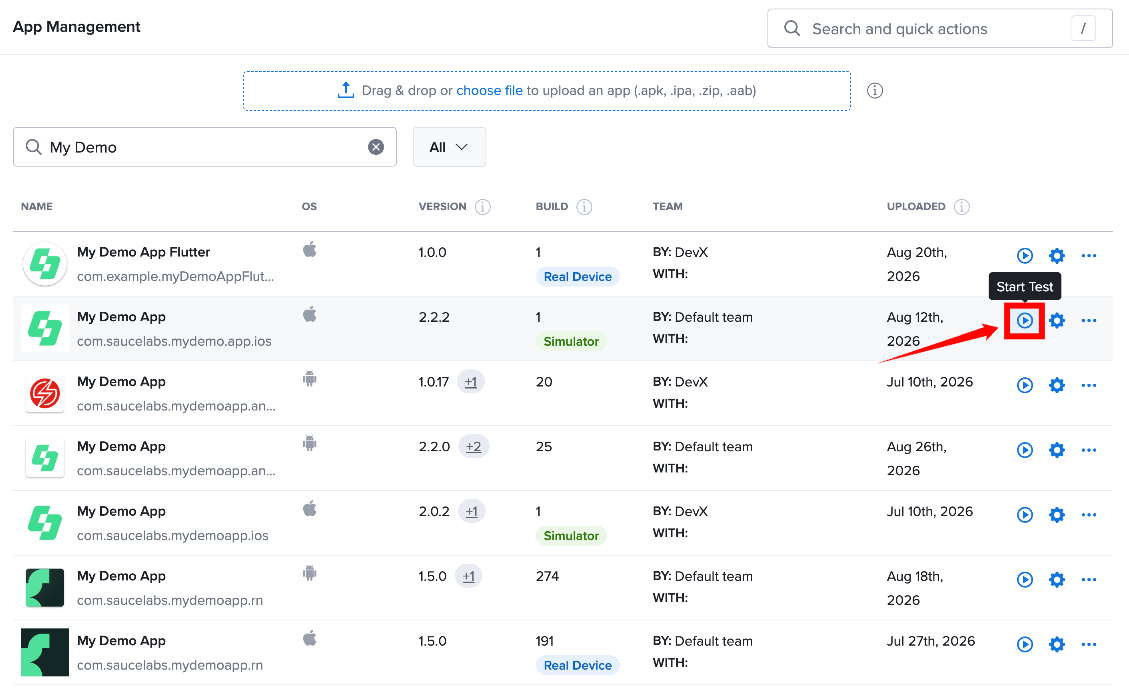
Step 4: On the App Management test page, locate the test you configured for image injection. Hover over the test and select Start Test.
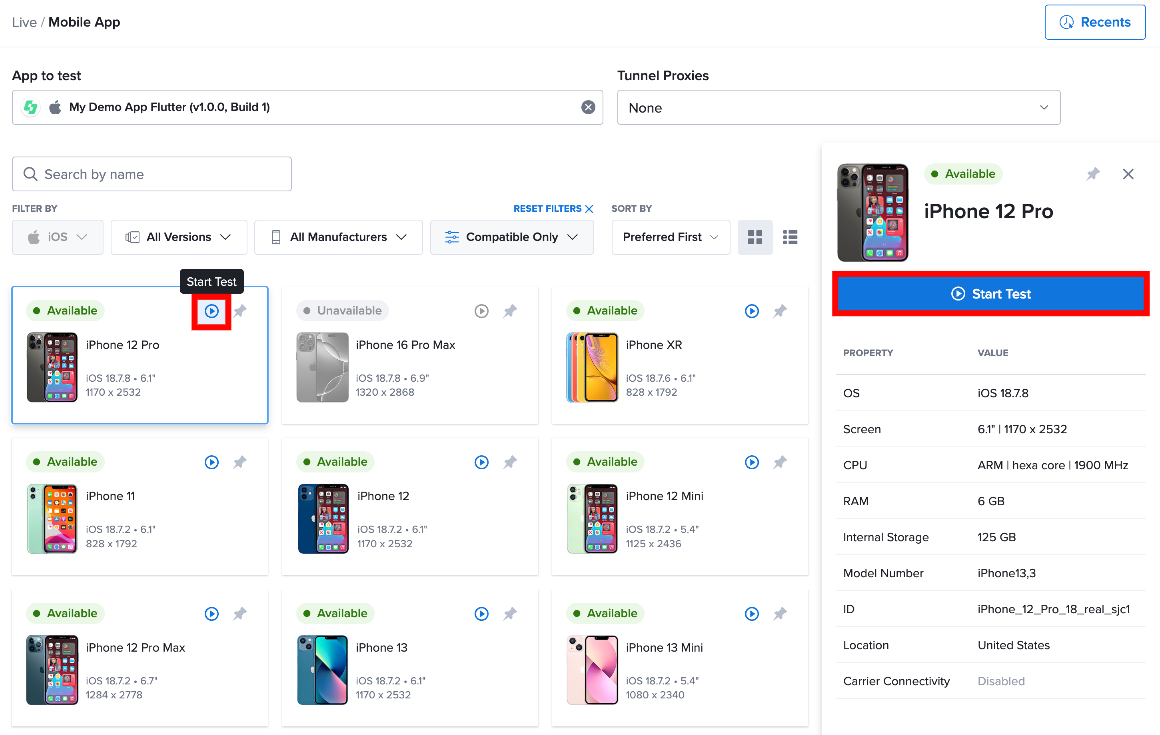
Step 5: On the device selection page, select the real device you want to use for the test. Hover over the device and select Start Test to launch the live testing session.
Step 6: Wait for the live test session to start and for your application to load on the selected device. When you reach the point in your test where the application needs to capture an image using the camera, you can upload the image that you want to inject.
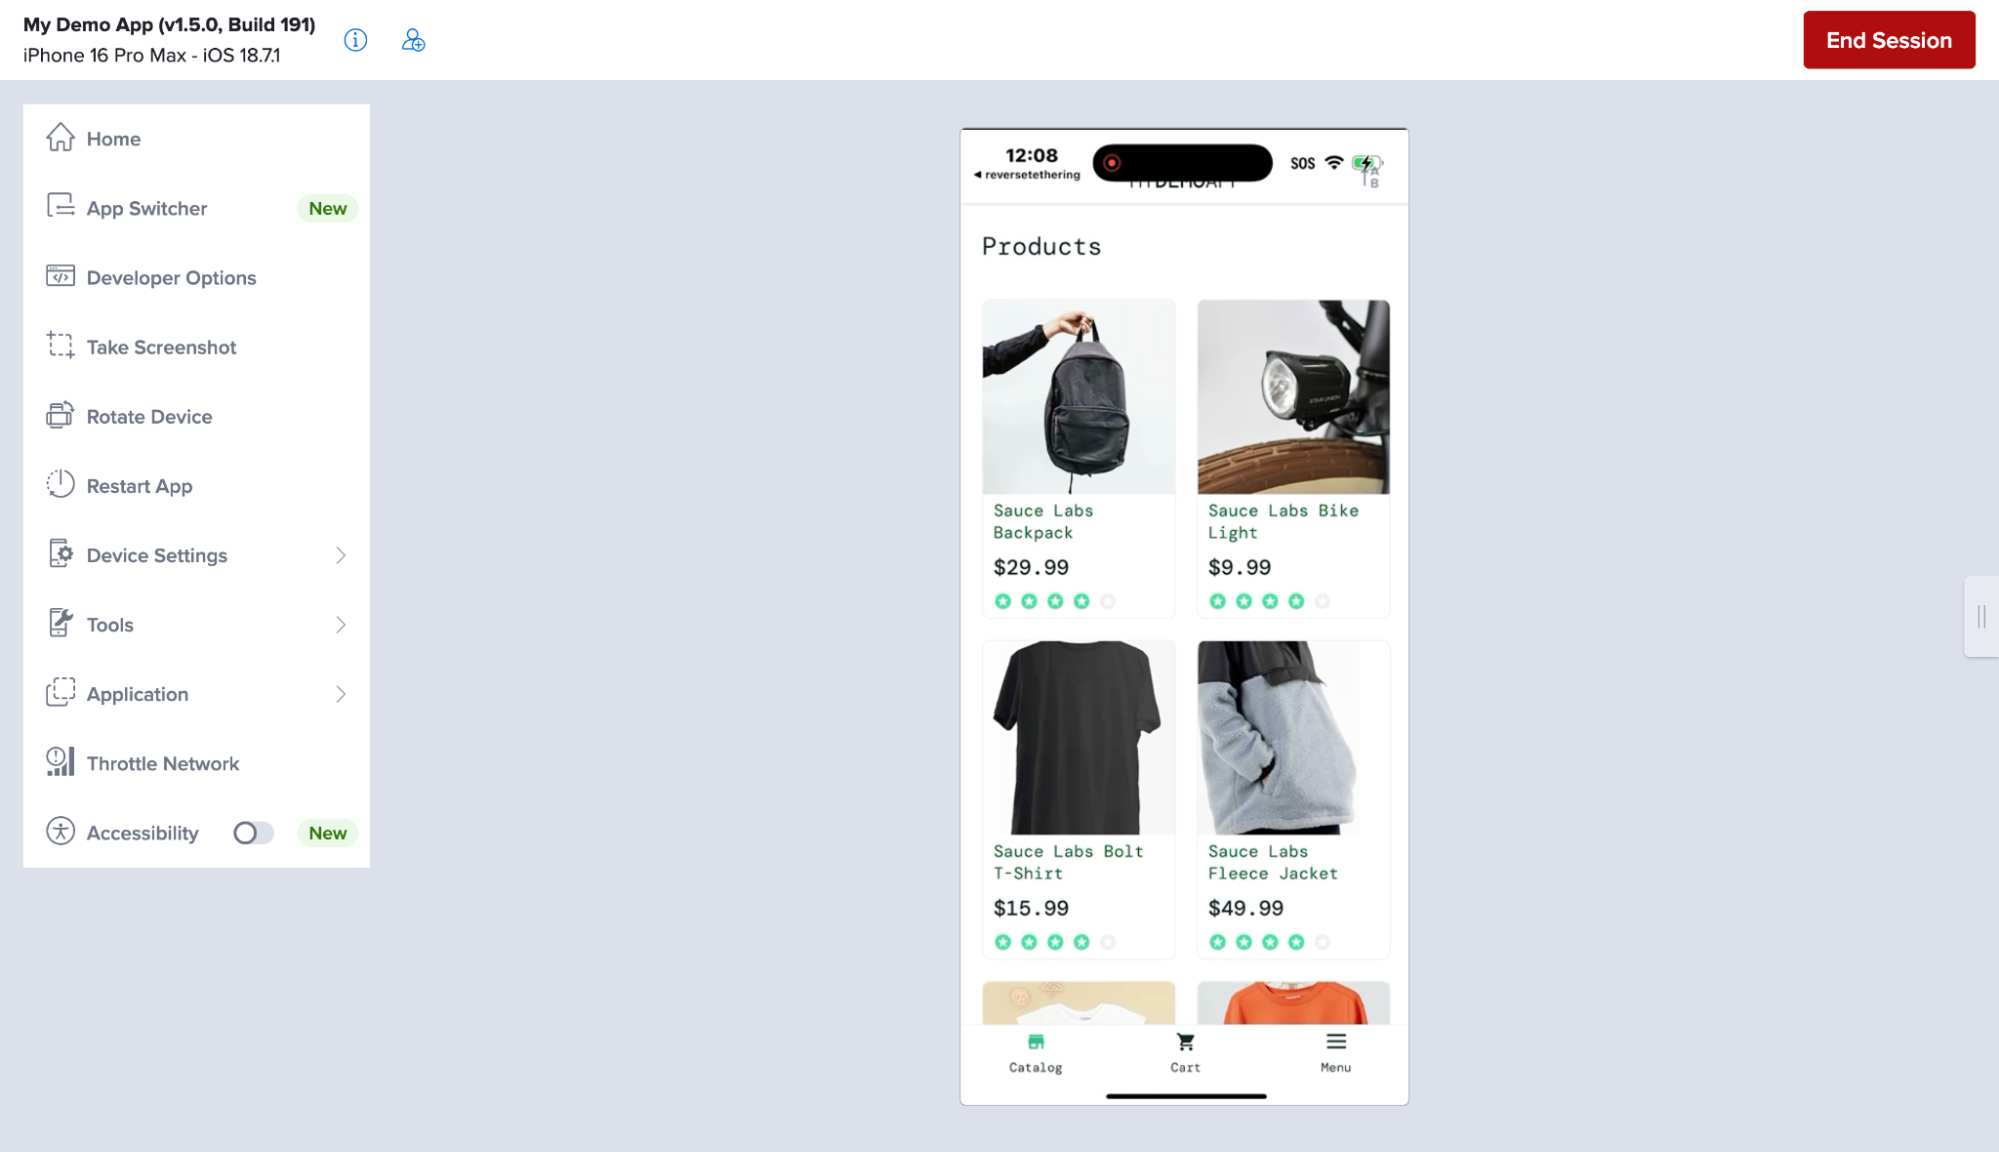
Upload an Image
Step 1: In the live test window, locate the toolbar on the right side of the screen. Select Tools to open the available testing tools.
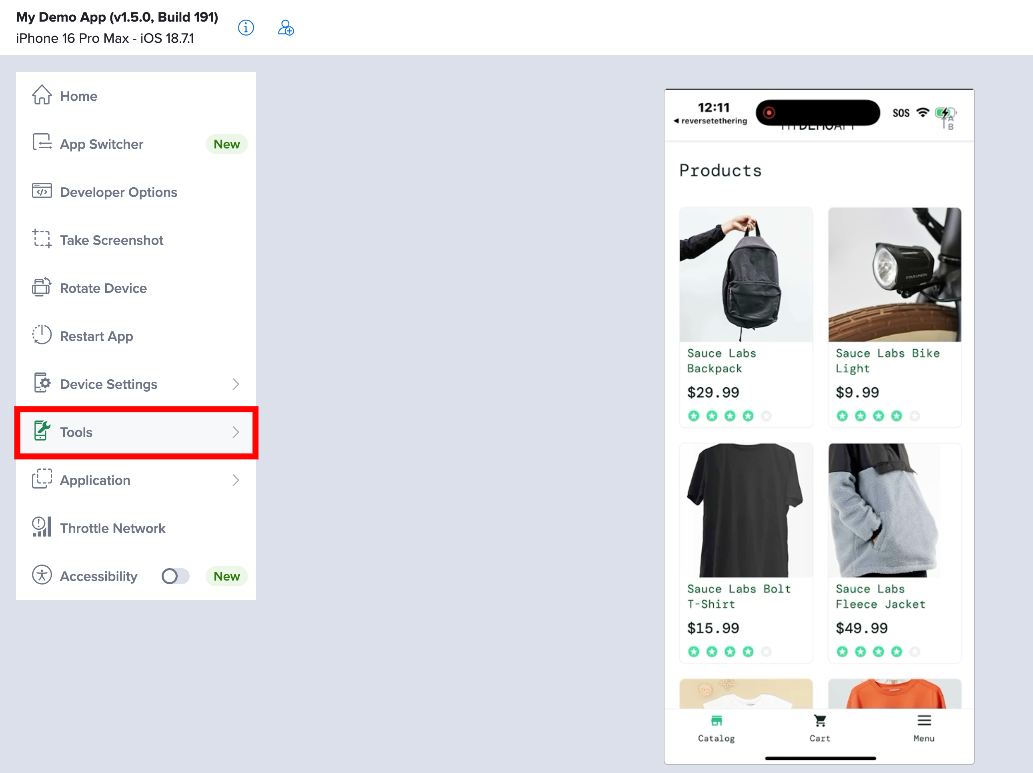
Step 2: From the Tools menu, select Camera Upload. This opens the image upload option for Camera Image Injection.
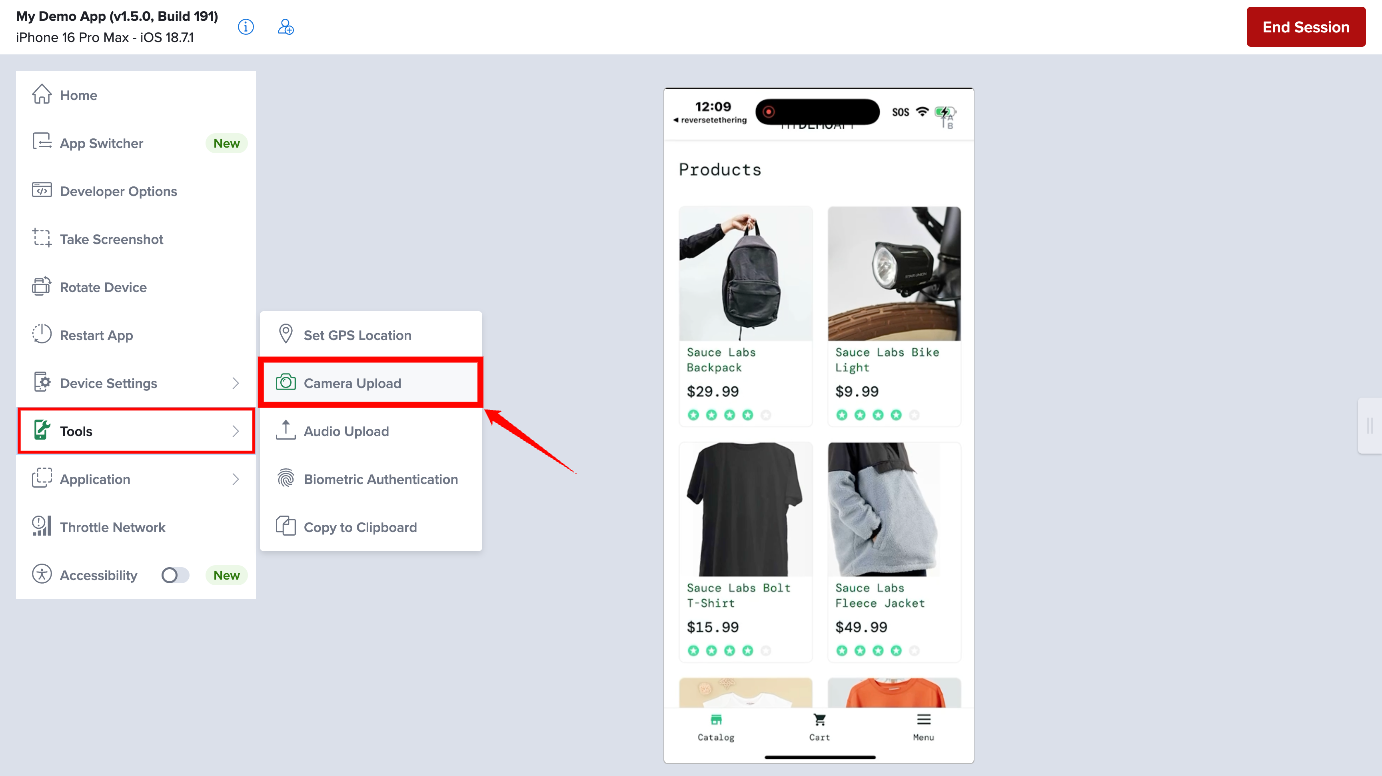
Step 3: Select Choose Image and browse to the image file you want to use as the camera input.
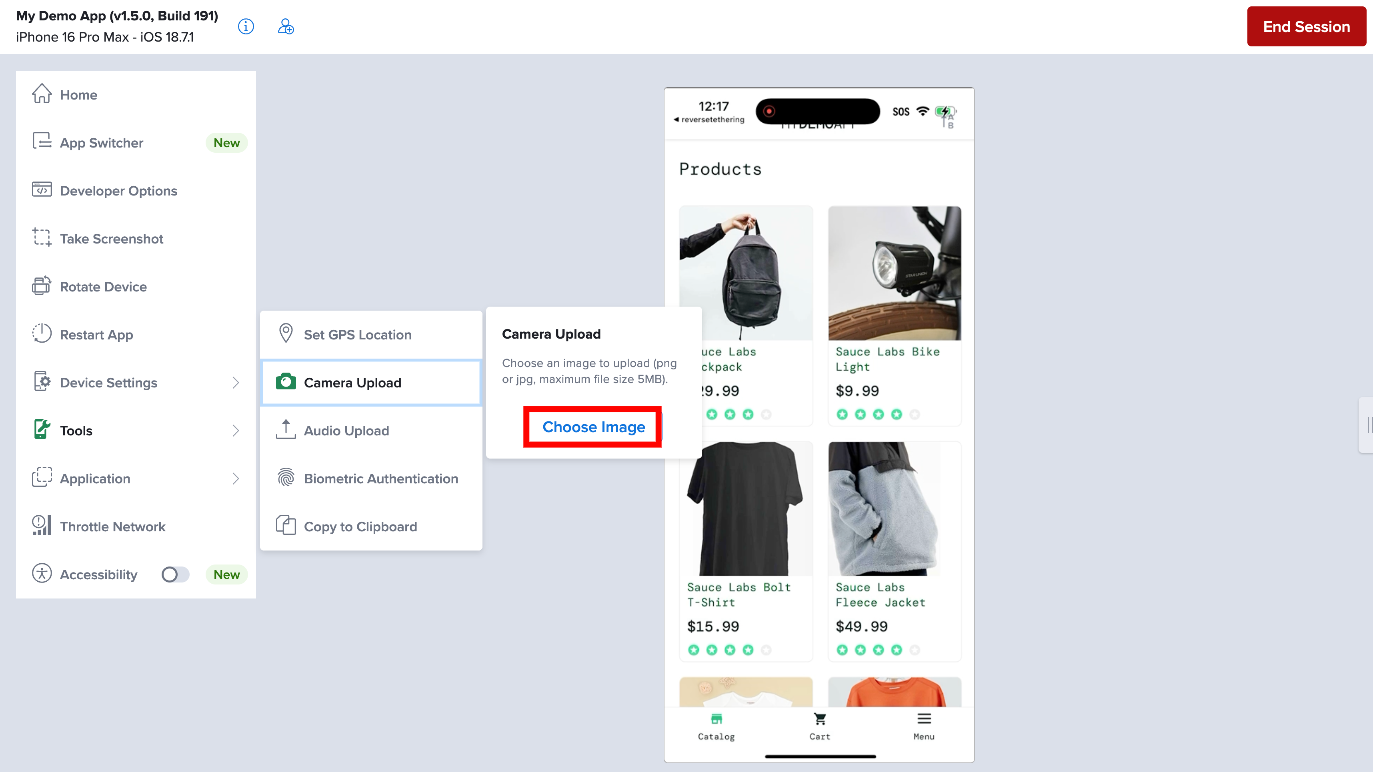
Step 4: Select the image to upload it to the test session. Once the upload is successful, Sauce Labs displays a thumbnail of the uploaded image along with a successful upload message, and the image becomes available as camera input for your application.
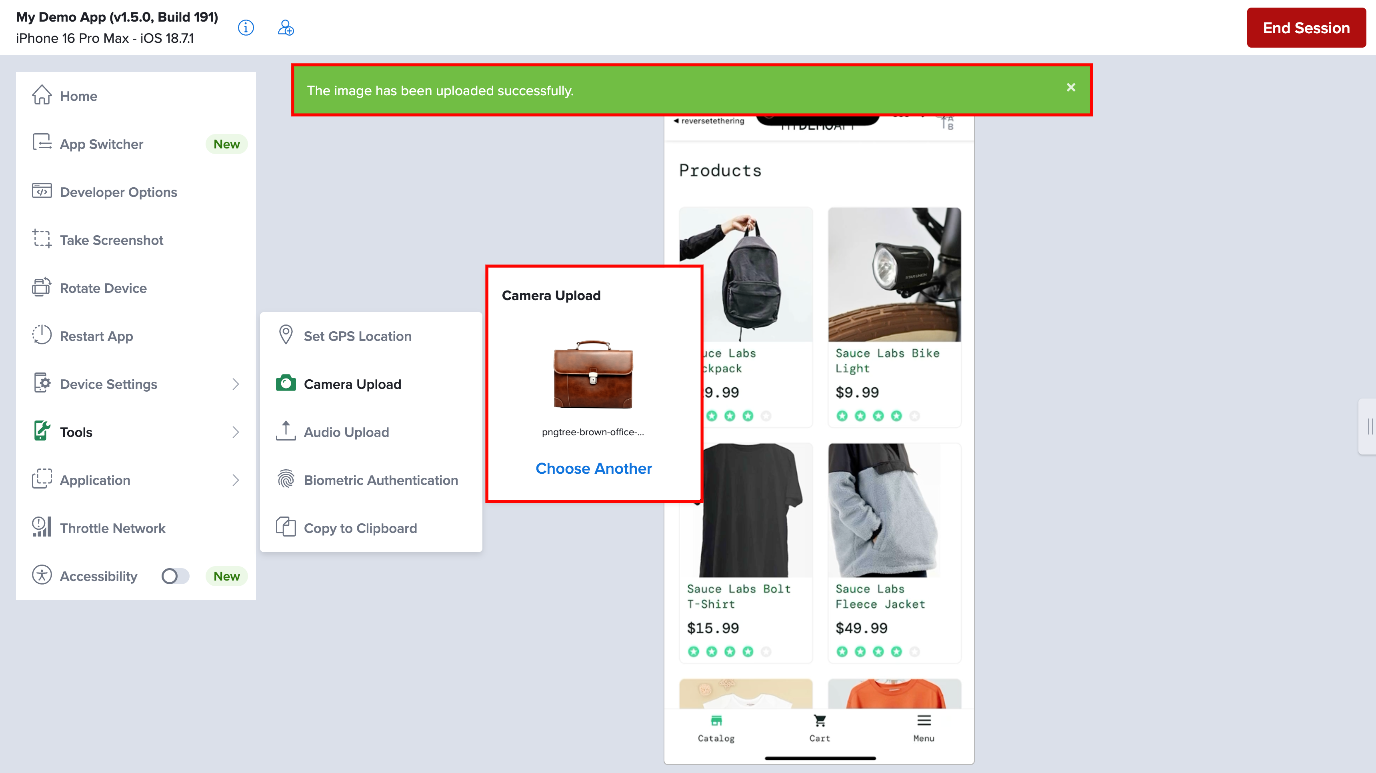
Now open or activate the camera functionality in your mobile application. Instead of receiving an image captured by the physical device camera, your application receives the image you uploaded through Camera Upload. The application can then process the image as it normally would process camera input.
The uploaded image remains available for the rest of the test session. If you return to the camera later in the same session, the previously uploaded image can still be used.
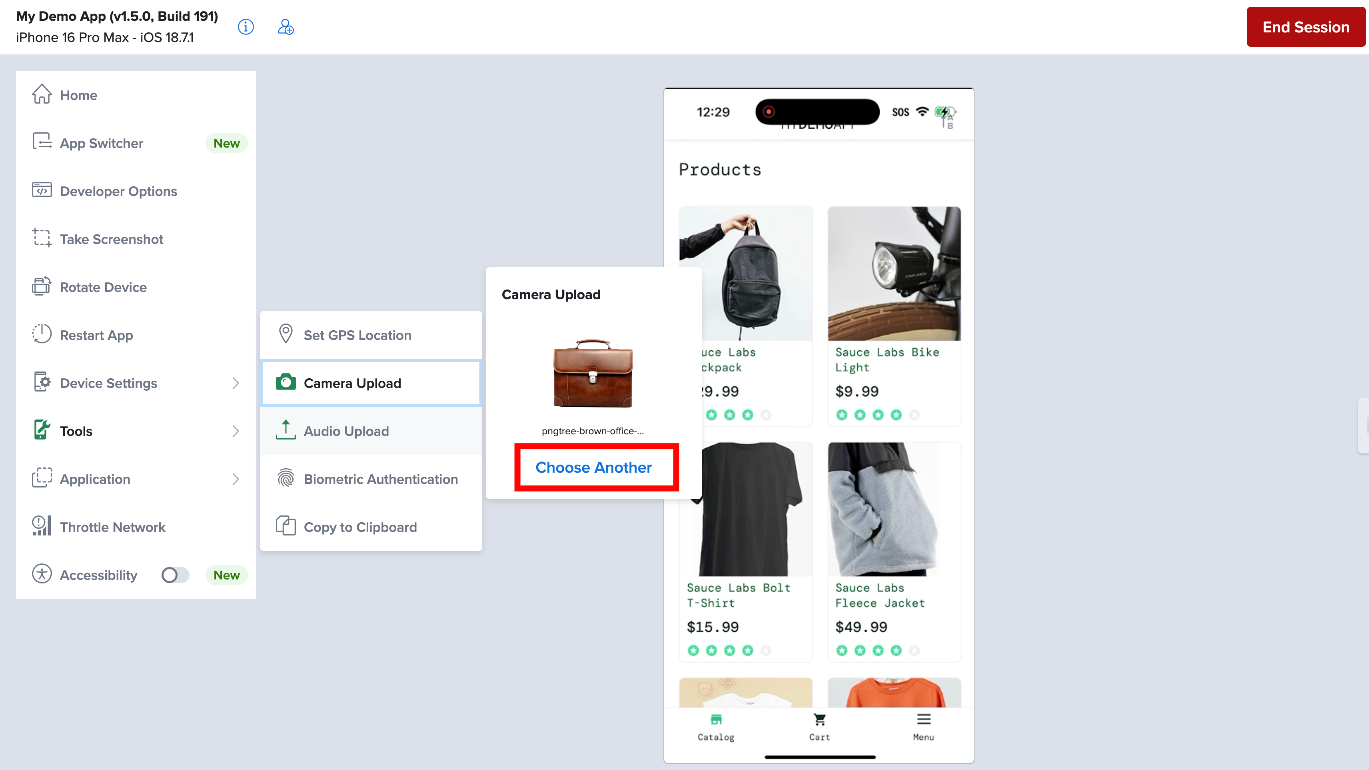
Step 5: To test another camera scenario, upload a different image using Tools > Camera Upload. The newly uploaded image can then be used as the camera input for subsequent camera interactions.
Testing with QR Codes
You can use Camera Image Injection to test QR code scanning workflows by uploading a QR code image and providing it to your application as camera input.
Upload a QR Code
Step 1: Start a live test and open the application on the selected real device.
Step 2: In the live test window, locate the toolbar on the right side of the screen and select Tools. From the Tools menu, select Camera Upload.
Step 3: Click Choose Image and navigate to the QR code image you want to use for testing.
Step 4: Select the QR code image to upload it to the test session. If the upload is successful, Sauce Labs displays a thumbnail of the uploaded image along with a successful upload message.
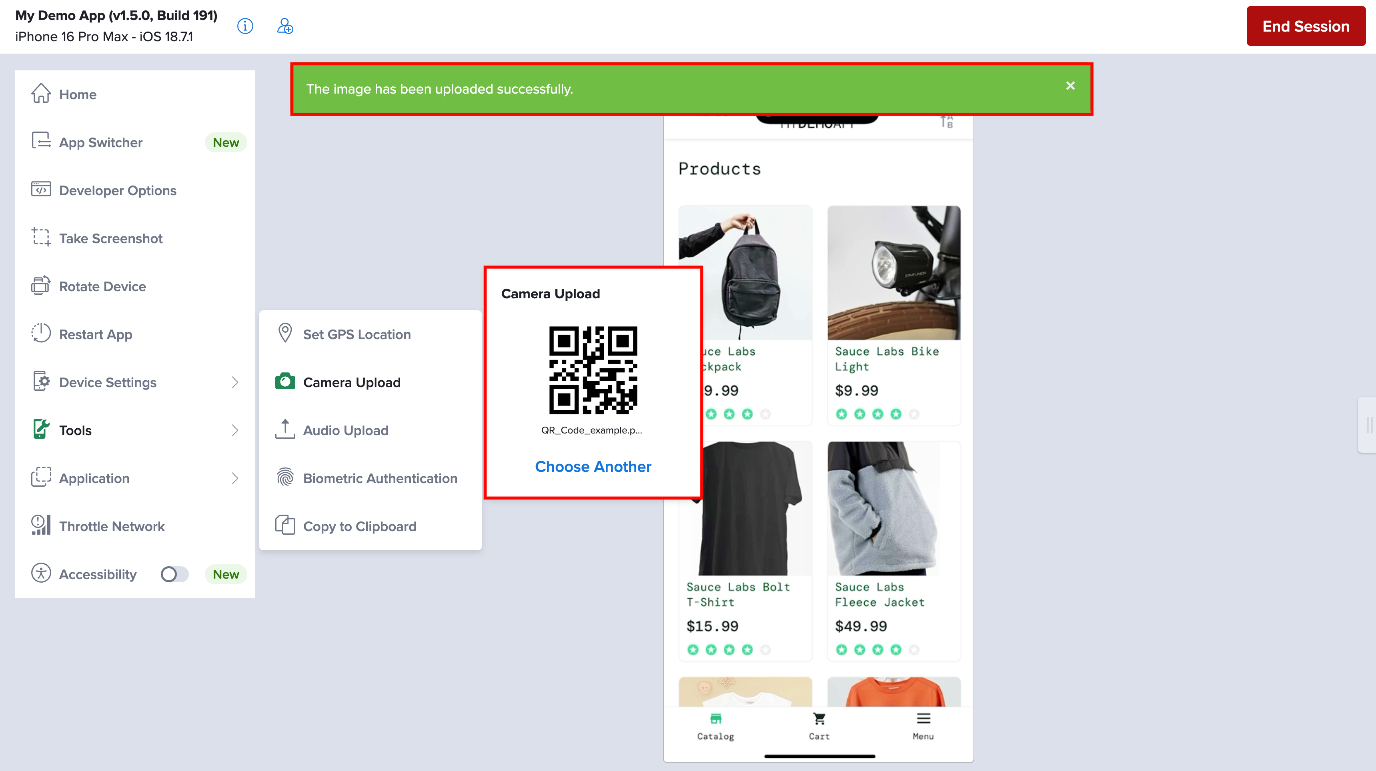
Now open the QR code scanning functionality in your application. The application receives the uploaded QR code image as camera input and processes it according to its implementation.
Add Padding to QR Code Images
In some cases, your application may not recognize an injected QR code because the QR code does not fit in the target area defined by the application.
Camera Image Injection replaces the camera input with the uploaded image and scales the image to fit the camera image size as closely as possible. The resulting image size or positioning may not always match what your application expects.
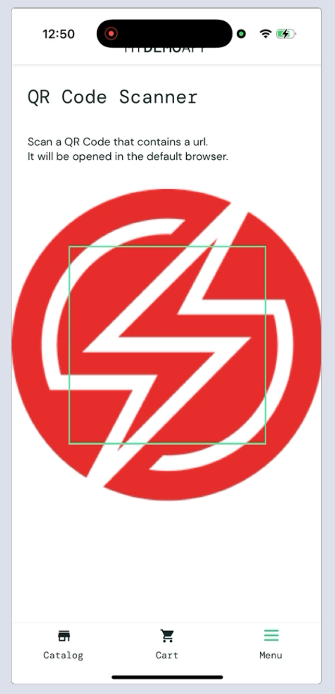
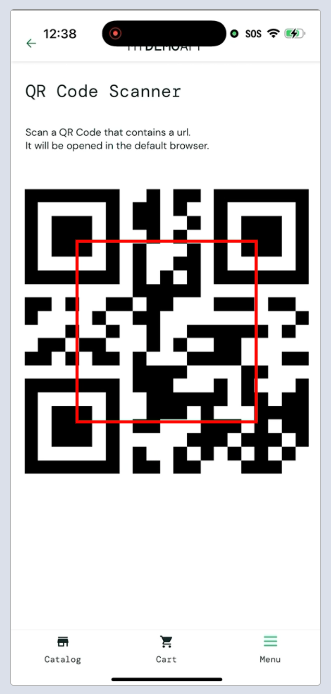
If your application only recognizes a QR code when it appears within a specific target area, account for this behavior when preparing the image for testing.
To help the QR code fit within the expected area, add extra space around the QR code before uploading it. This additional space, or padding, helps position the QR code within the target area defined by your application and can improve QR code recognition during the test.
Automated Testing
During an automated test, you'll pass an image to the image injection endpoint. Image injection intercepts the camera input and replaces the camera output with the image file via the camera APIs. When the app requests an image from the device's camera, we inject your uploaded image into the response (the app doesn't know the difference).
In your test script, you'll need to input the desired capabilities specific to Camera Image Injection (see below code snippets). The code will execute your image upload and opening of the device camera.
Step 1: First, add the camera instrumentation desired capability command, imageInjection, to your test script. This capability enables image injection functionality.
- Webdriver.io example
- Java example
exports.config = {
//...
capabilities: [
{
deviceName: 'Samsung Galaxy S10',
platformName: 'Android',
platformVersion: '10',
automationName: 'UiAutomator2',
// Enable image-injection on RDC
imageInjection: true
}
]
//...
}
var desiredCapabilities = new DesiredCapabilities();
desiredCapabilities.setCapability("deviceName", "Samsung Galaxy S10");
desiredCapabilities.setCapability("platformVersionName", "10");
...
// Enable image-injection on RDC
desiredCapabilities.setCapability("imageInjection", true);
Step 2: In this step, you're adding the image injection method to your test script by providing a file path to your image. You can put the below code snippet into your test script in one or more places. Then, when you run your test, the code snippets will call the endpoint and pass the image to the app for further processing or for other use.
To change the image, you'll need to send a custom command with a different image. Note that your image file path must be converted to base64 encoding.
- Webdriver.io example
- Java example
const { readFileSync } = require('fs')
const { join } = require('path')

// Read the file from your project and transform it to a base64 string
const qrCodeImage = readFileSync(
join(process.cwd(), 'assets/qr-code.png'),
'base64'
)

// Provide the transformed image to the device
driver.execute(`sauce:inject-image=${qrCodeImage}`)
import java.util.Base64;
import static org.apache.commons.io.IOUtils.toByteArray;

// Read the file from the classpath and transform it to a base64 string
FileInputStream in = new FileInputStream("/Users/enriquegonzalez/Desktop/Gorilla.png");
qrCodeImage = Base64.getEncoder().encodeToString(
        toByteArray(in)
);
// Provide the transformed image to the device
((JavascriptExecutor)driver).executeScript("sauce:inject-image=" + qrCodeImage);
Common Errors
Here are some common errors you may see in the course of testing with camera image injection and how to resolve them.
Error: Image injection failed
This error is displayed when you attempt to inject your image before the app fully loads during your initial test session startup. You must wait until your app has fully loaded prior to injecting your image.
Error: Image injection is not enabled for the application
This error is displayed due to one or more of these reasons:
- Enable Image Injection checkbox is not checked; this needs to be checked.
- For Android tests, the debuggable flag (
android:debuggable="true") is missing from your app's manifest file.