Setting Up Backtrace for iOS
Add Backtrace to your iOS project to automatically detect and report handled and unhandled exceptions, errors, and crashes that occur in your apps written in Swift or Objective-C.
After you've completed the steps on this page, the Backtrace client will be installed and setup with the default configuration settings. Crash and error reports will include the following metadata:
- system
- machine
- signal
- exception
- thread
- process
Supported Platforms
- iOS 13+
- macOS 12+
- tvOS 13+
Privacy manifest
The iOS SDK contains a privacy manifest to declare the types of data accessed on the device. Refer to this source document for the specific types of data collected by the SDK.
What You'll Need
- A Backtrace account (log in or sign up for a free trial license).
- Your subdomain name (used to connect to your Backtrace instance). For example,
https://example-subdomain.sp.backtrace.io. - A Backtrace project and a submission token.
System Requirements
- An Xcode version that supports your target SDK. The Swift package declares Swift tools version 5.5.
Install the SDK
You can install the SDK with Swift Package Manager (SPM) or CocoaPods. The SPM package can be integrated directly in Xcode or by editing your package's Package.swift file.
- Xcode
- Swift Package Manager
- CocoaPods
- In Xcode select File > Add Packages, then search for and add
https://github.com/backtrace-labs/backtrace-cocoa.git. - Verify your project Package Dependencies list for backtrace-cocoa.
- Add Backtrace to your target’s Frameworks, Libraries, and Embedded Content.
Package.swift file:.package(url: "https://github.com/backtrace-labs/backtrace-cocoa.git", from: "2.1.0")
Podfile:- Specify
use_frameworks!. - Add the
Backtracepod:pod 'Backtrace'
Initialize the Backtrace Client
To initialize BacktraceClient, create a BacktraceCredentials object with the name of your subdomain and submission token, and supply it to the BacktraceClient constructor:
Run this initialization once per app process in AppDelegate.application(_:didFinishLaunchingWithOptions:), or application:didFinishLaunchingWithOptions: in Objective-C, before scene connection.
- Swift
- Objective-C
// provide the name of the subdomain for your Backtrace instance and a submission token
let backtraceCredentials = BacktraceCredentials(submissionUrl: URL(string: "https://submit.backtrace.io/{subdomain-name}/{submission-token}/plcrash")!)
BacktraceClient.shared = try BacktraceClient(credentials: backtraceCredentials)
// provide the name of the subdomain for your Backtrace instance and a submission token
BacktraceCredentials *backtraceCredentials = [[BacktraceCredentials alloc] initWithSubmissionUrl: [NSURL URLWithString: @"https://submit.backtrace.io/{subdomain-name}/{submission-token}/plcrash"]];
NSError *initializationError = nil;
BacktraceClient.shared = [[BacktraceClient alloc] initWithCredentials:backtraceCredentials error:&initializationError];
OS 27 Scene Lifecycle
UIKit applications built with the OS 27 SDK must adopt the scene-based lifecycle to launch on iOS 27, iPadOS 27, Mac Catalyst 27, and tvOS 27. Follow Apple's scene-lifecycle migration guide to configure your host application. Installing or updating Backtrace does not add scene support to your app.
The Swift iOS, Objective-C iOS, and tvOS examples declare scenes in UIApplicationSceneManifest, give each scene delegate ownership of its window, and load the Main storyboard through UISceneStoryboardFile. The examples use a single scene; scene adoption does not require multi-window support.
Keep Backtrace initialization in the app delegate's launch callback. Do not create a client in scene(_:willConnectTo:options:) or each time a scene becomes active. Scene creation, reconnection, and foreground transitions must reuse the process's existing client.
After migration, verify application launch, background and foreground transitions, and scene reconnection. Use the setup checks to test crash capture and delivery after relaunch separately from scene setup.
Upload Debug Symbols
After compiling your application with the new backtrace-cocoa library, make sure symbol files are generated in dSYM format and are uploaded to Backtrace to symbolicate incoming crashes.
For information on how to upload debug symbols, see Upload Symbols to Your Project.
Set Debug Symbol Format
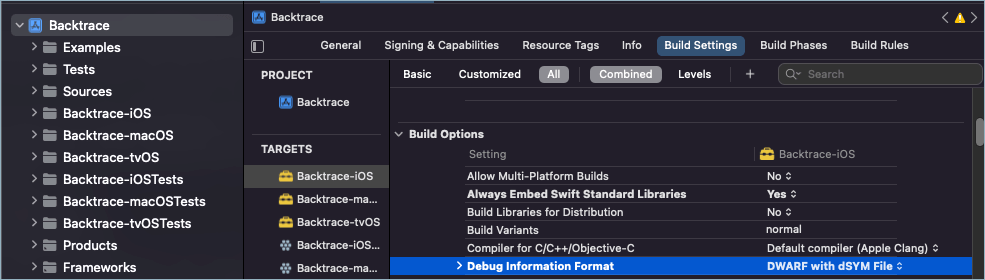
When building your iOS game in Xcode, make sure to configure the build settings to generate dSYM files for any build that you want to debug with Backtrace. By default, Xcode may only generate DWARF files.
To generate debug symbols in dSYM format:
- In Xcode, go to your project target's Build Settings.
- Under Build Options, set Debug Information Format to DWARF with dSYM File.
Find Debug Symbols
To find dSYM files while building the project:
- In Xcode, build your project.
- From the Products folder, select your iOS app.
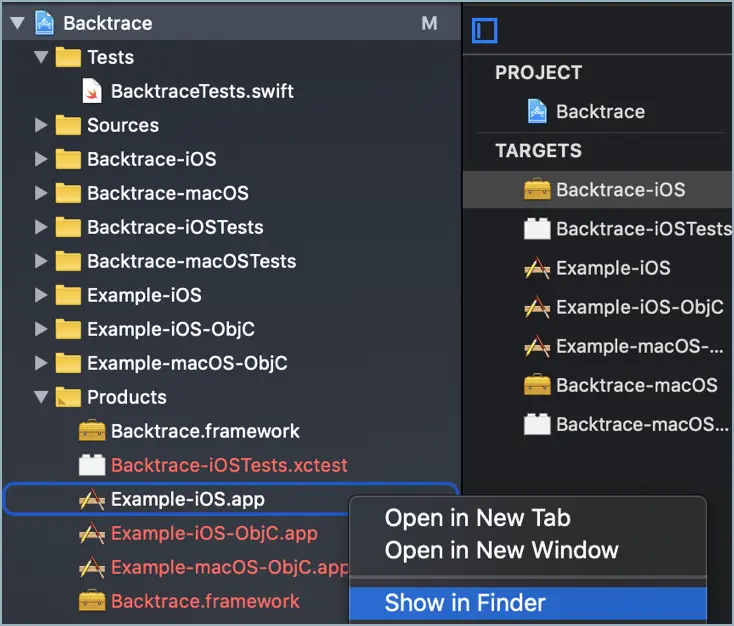
- Right-click, then click Show in Finder.
- Zip all the dSYM files and upload to Backtrace.
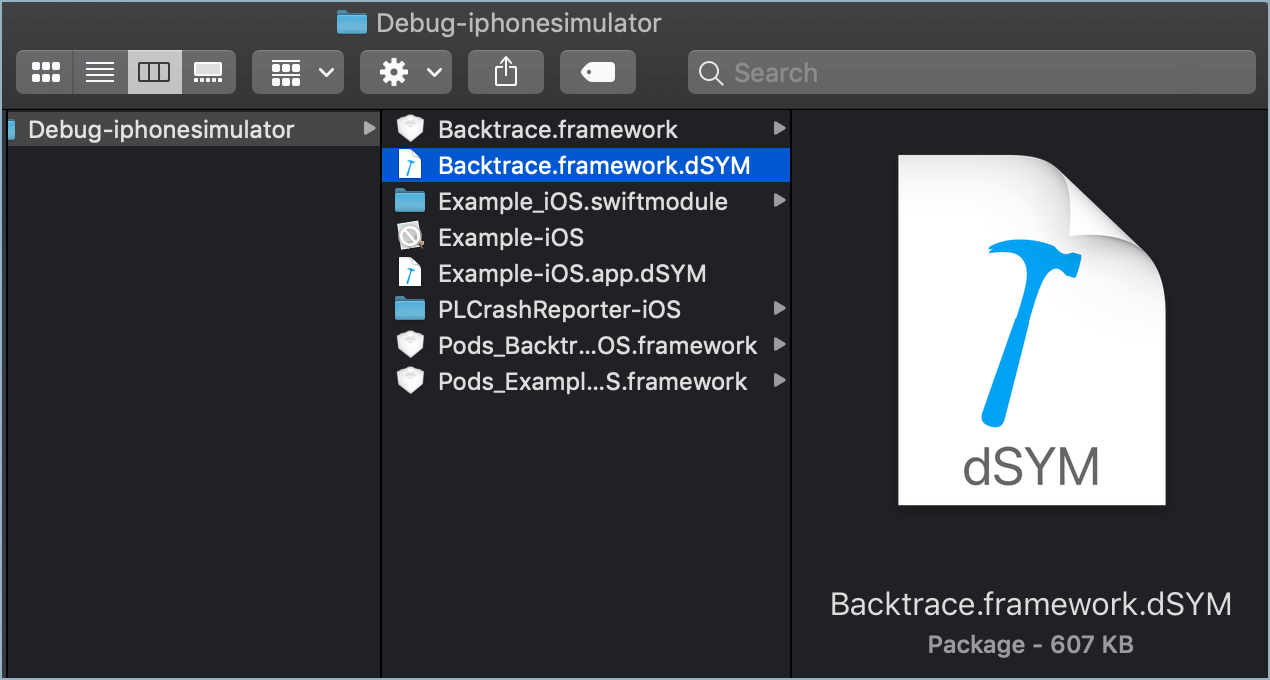
To find dSYM files while archiving the project:
- In Xcode, archive your project.
- To open the Archives organizer, go to Window > Organizer and click Archives.
- Select your iOS app, then click Show in Finder. dSYMs are stored in a
.xcarchivefile.
- Right-click, then click Show Package Contents.

- Search for the dSYMs folder.
- Zip all the dSYM files and upload to Backtrace.

Verify the Setup
At this point, you've installed and setup the Backtrace client to automatically capture exceptions, errors, and crashes in your iOS app.
To test the integration, send an error or exception to your Backtrace instance. By default, reports are suppressed while a debugger is attached. For a native crash test, run without a debugger, trigger the crash, and relaunch the app to submit the pending report. See Cocoa Report Delivery for startup diagnostics and retry behavior.
Send an Error/NSError
- Swift
- Objective-C
@objc func send(error: Error,
                attachmentPaths: [String] = [],
                completion: @escaping ((BacktraceResult) -> Void))
- (void)sendWithError:(NSError * _Nonnull)error
     attachmentPaths:(NSArray<NSString *> * _Nonnull)attachmentPaths
          completion:(void (^ _Nonnull)(BacktraceResult * _Nonnull))completion;
Send an NSException
- Swift
- Objective-C
@objc func send(exception: NSException?,
                attachmentPaths: [String] = [],
                completion: @escaping ((BacktraceResult) -> Void))
- (void)sendWithException:(NSException * _Nullable)exception
         attachmentPaths:(NSArray<NSString *> * _Nonnull)attachmentPaths
              completion:(void (^ _Nonnull)(BacktraceResult * _Nonnull))completion;
Send macOS Exceptions
If you want to catch additional exceptions on macOS which are not forwarded by macOS runtime, set NSPrincipalClass to Backtrace.BacktraceCrashExceptionApplication in your Info.plist file.
Alternatively, you can set:
- Swift
- Objective-C
UserDefaults.standard.register(defaults: ["NSApplicationCrashOnExceptions": true])
[[NSUserDefaults standardUserDefaults] registerDefaults:@{ @"NSApplicationCrashOnExceptions": @YES }];
Make sure to use @try ... @catch or your app will crash.