Set Up Error Reporting MCP with Claude Code
Connect Error Reporting MCP to Claude Code to access and investigate Error Reporting data directly from your development environment. Once connected, you can use natural-language prompts to list projects, find errors, and investigate error details without switching between Claude Code and the Error Reporting interface.
Choose an Authentication Method
The Error Reporting MCP server (https://mcp.saucelabs.com) supports two ways to authenticate. Choose one per connection.
| Method | Best for | How it works |
|---|---|---|
| Single sign-on (SSO) | Interactive use on your own machine | You sign in through your browser with your usual Sauce Labs credentials. No tokens to manage. |
| Access token | Scripts, CI jobs, and headless agents | You supply an Error Reporting API token that is scoped to a single project. No browser required. |
Both methods require your universe name, which is the Error Reporting tenant your projects belong to. It is the subdomain you use to reach Error Reporting: for https://saucelabs.sp.backtrace.io, the universe is saucelabs.
Option 1: Connect with Single Sign-On
With this method, you pass only your universe name in the X-Backtrace-Universe header, and Claude Code handles sign-in through your browser.
Add the Server Using the CLI (SSO)
In your terminal, add the Error Reporting MCP server, replacing <universe> with your universe name:
claude mcp add --transport http sauce-labs https://mcp.saucelabs.com \
  --header "X-Backtrace-Universe: <universe>"
Add the Server Using a Configuration File (SSO)
You can also add the Error Reporting MCP server to a .mcp.json file in your project root or to your user-level ~/.claude.json file. Because this configuration contains no secrets, you can check it in and share it with your team.
{
  "mcpServers": {
    "sauce-labs": {
      "type": "http",
      "url": "https://mcp.saucelabs.com",
      "headers": {
        "X-Backtrace-Universe": "<universe>"
      }
    }
  }
}
Sign In
Step 1: In Claude Code, open the MCP menu by entering /mcp.
Step 2: Select the Error Reporting MCP server, then select Authenticate. Your browser opens the Sauce Labs sign-in page.
Step 3: Sign in and approve the consent screen. Claude Code is then connected with your own account and permissions.
If your client cannot send the X-Backtrace-Universe header, the sign-in flow prompts you for your universe name instead. Enter the same value you would have sent in the header.
Option 2: Connect with an Access Token
Use this method to automate engineering workflows such as CI/CD jobs, local development and testing or agent-to-agent automation.
| Header | Description | Required |
|---|---|---|
X-Backtrace-Universe | Your universe name, for example saucelabs. | Yes |
X-Backtrace-Token | The Error Reporting API token you create below. | Yes |
X-Backtrace-Project | The project the token is scoped to. | Yes |
Create an API Token
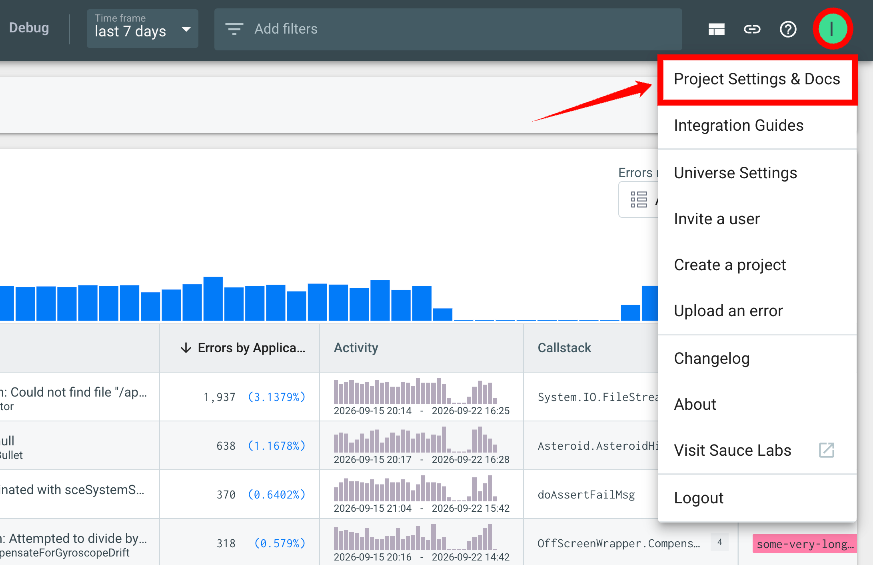
Step 1: In Error Reporting, select your profile icon in the top-right corner, then select Project Settings & Docs.
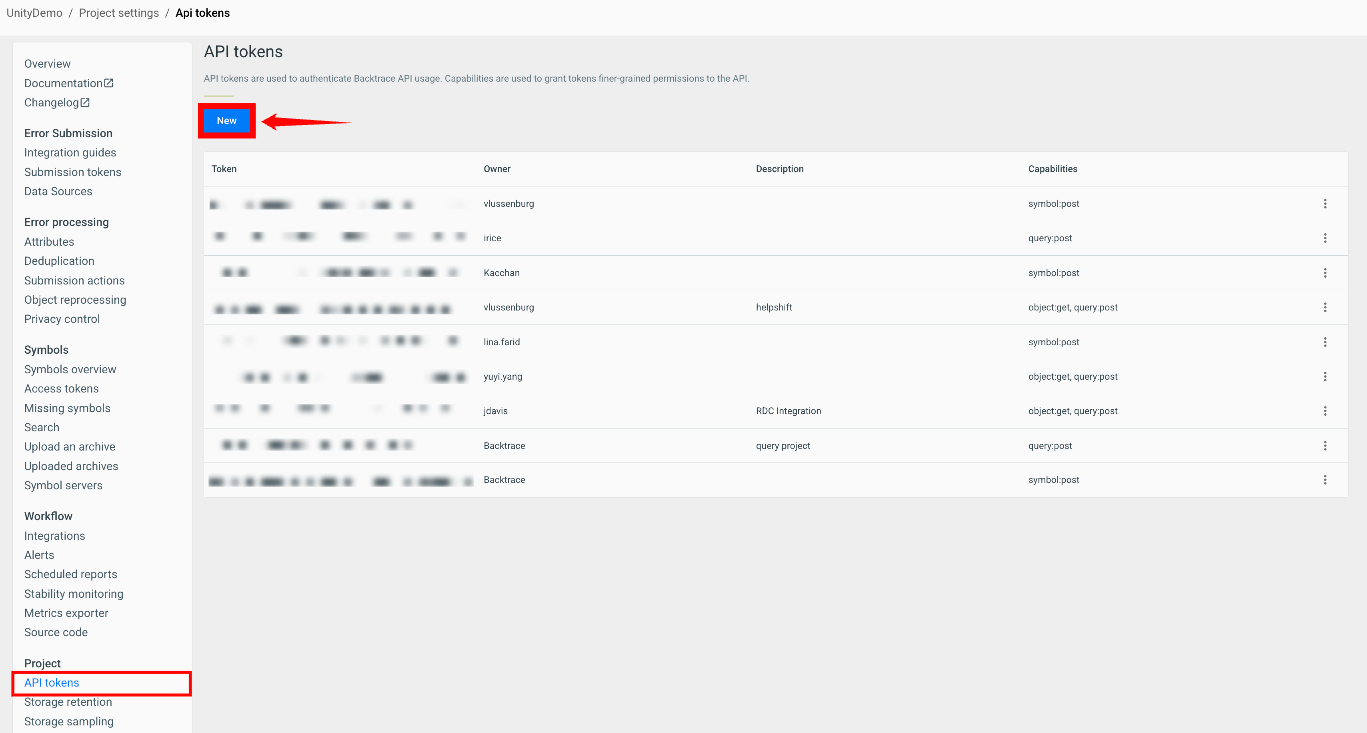
Step 2: Confirm that the project shown in the breadcrumb is the project you want the token to access. Under Project, select API tokens, then select New to create a new token.
Step 3: In the dialog that opens, enter an optional description, select the following capabilities, then select Create:
object:get- allows the MCP tools to fetch individual errors and their attachments.query:post- allows the MCP tools to run queries, such as listing crash groups.
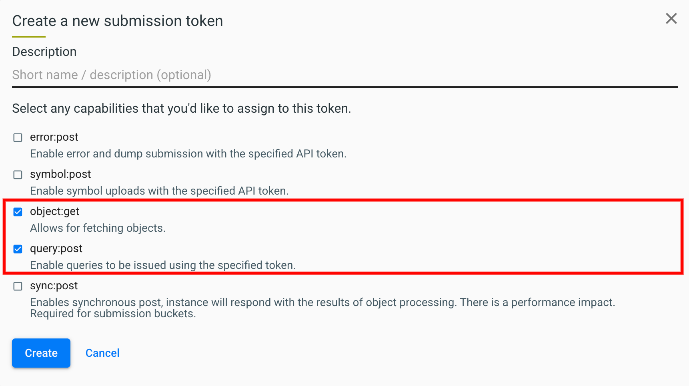
The dialog is titled Create a new submission token, but because you opened it from the API tokens page, it creates an API token.
Leave the remaining capabilities cleared so that the token stays read-only.
Step 4: Copy the token value from the API tokens table. You can revoke the token from the same page at any time by disabling it or deleting it.
Add the Server Using the CLI (Access Token)
claude mcp add --transport http sauce-labs https://mcp.saucelabs.com \
  --header "X-Backtrace-Universe: <universe>" \
  --header "X-Backtrace-Token: $BACKTRACE_TOKEN" \
  --header "X-Backtrace-Project: <project>"
If you already added the server using single sign-on, remove it first with claude mcp remove sauce-labs, or add this one under a different name.
Add the Server Using a Configuration File (Access Token)
Reference the token through an environment variable so that the secret stays out of the file:
{
  "mcpServers": {
    "sauce-labs": {
      "type": "http",
      "url": "https://mcp.saucelabs.com",
      "headers": {
        "X-Backtrace-Universe": "<universe>",
        "X-Backtrace-Token": "${BACKTRACE_TOKEN}",
        "X-Backtrace-Project": "<project>"
      }
    }
  }
}
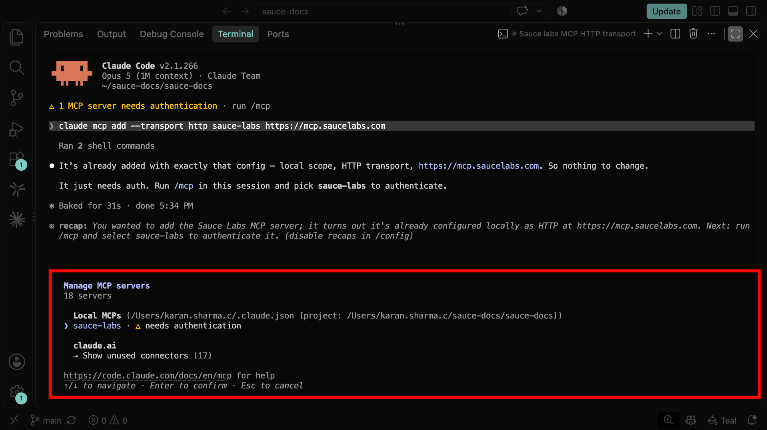
Verify the MCP Connection
Step 1: After adding the server, open the MCP menu in Claude Code by entering:
/mcp
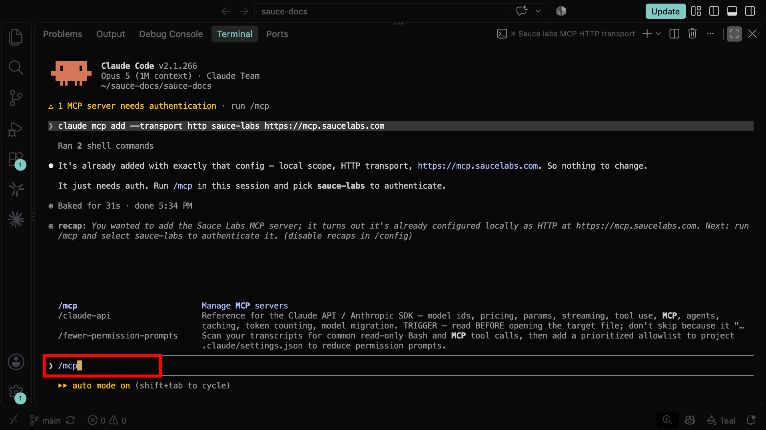
Step 2: Locate the Error Reporting MCP server in the list of configured MCP servers.
The Error Reporting MCP server name and connection details may vary depending on your organization's configuration.
Troubleshooting
| Issue | Resolution |
|---|---|
The server responds with 401. | Your session may have expired. Run /mcp and authenticate again. If you are using an access token, confirm that the token is still enabled and that the universe, token, and project headers all match. |
| The sign-in flow asks for your universe. | Your client did not send the X-Backtrace-Universe header. Enter your universe name, as described in Choose an Authentication Method. |
| A tool asks which project to use. | Enter the same project name that you set in the X-Backtrace-Project header. |
Next Steps
Now that Error Reporting MCP is connected to Claude Code, see Error Reporting MCP Tools for example prompts and the full list of available tools.